Skip to content
Mc Starters Main Logo Circle
  • Home
  • CompanyExpand
    • About Us
    • Meet with Team
    • Media Assets
    • We’re Hiring
    • Contact Us
  • Top CategoriesExpand
    • WooCommerce
    • Elementor
    • Webflow
    • Divi
    • WordPress
    • SEO
    • Payoneer Guides
    • Shopify Tutorials
    • Squarespace
    • Weebly
    • Wix
    • Website Builders
    • CRM
    • Payment
  • Tips and TricksExpand
    • AI
    • Business
    • Insurance
    • Resources
    • Review
    • Science and Technology
    • Windows 10
    • Windows 11
  • ServicesExpand
    • WordPress Web Design
    • Elementor Expert
    • Divi Theme Experts
    • Blog Setup
    • WordPress Customization
    • E-Commerce Websites
    • Crocoblock Expert
    • Hire Webflow Expert
  • Free TemplatesExpand
    • Elementor Templates
    • Elementor Header
    • Elementor Footer
    • Elementor Single Post Templates
    • Elementor Mega Menu
    • Divi Templates
    • Divi Header Layouts
    • Divi Footer Layout
  • Tools
  • Guest Posts

Lifetime Pro Access to Elementor & Divi Templates

Grab deal
Mc Starters Main Logo Circle
Home / Elementor / How to Enable Flex Container in Elementor Pro / Free?
How to Enable Flex Container in Elementor Pro / Free?

Published By :Iram S. September 14, 2023January 10, 2024 Elementor
Enable Flex Container

With the introduction of the new Flexbox Container element in the Elementor Page Builder 3.6, designing your website has become more flexible and efficient. This tool, replacing sections, columns, and inner sections in Elementor, enable flex container in Elementor to create attractive and responsive layouts quickly and easily, thereby enhancing your website’s performance.

The Flexbox’s page builder interface is user-friendly, making the transition smooth whether you’re new or switching from the old builder.

If you have questions about activating containers in Elementor, this guide will help you navigate through the process with easy-to-follow steps.

Enable Flex Container in Elementor Pro / Free

Here’s a step-by-step guide to enabling the Flex Container in Elementor (both Pro and Free versions)

Ensure that you have the Elementor plugin installed or updated to the latest version which supports the Flex Container feature.

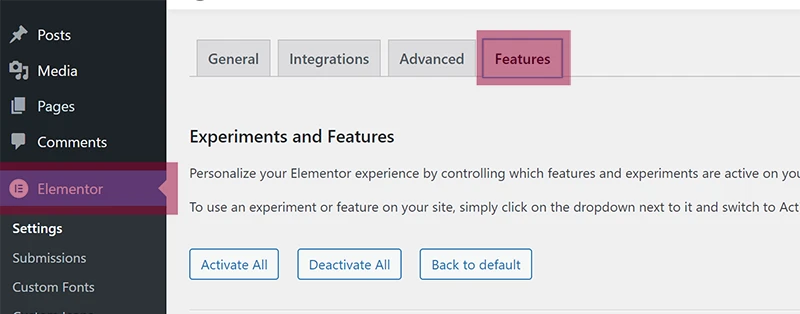
Step 1: Go to “Elementor” > “Settings” and Features Tab.
Flexbox Container 1

Noted: Here you can just click on Activate All if you want All Elementor new features.

Step 3: Scroll down and find the ‘Flexbox Container’ option and ‘activate’ it.

Flexbox Container 2

Step 4: Scroll to the end and save changes.

Flexbox Container 3

On new websites, the Flexbox container is active by default.

Conclusions

Enabling the Flexbox Container option in Elementor is a straightforward process. By following the above simple steps, users can effortlessly unlock more flexible and dynamic layout options for their website. It’s important to note that for those setting up new websites, this feature comes activated by default, making the process even more convenient.

See also  7 Essential Steps to Resolving Elementor Loading Problems

To enable Flex Container in Elementor Pro/Free, go to Settings > Elementor in WP Dashboard, select Experiments tab, activate Flexbox Container option, and save changes.

To enable the Flexbox container in Elementor, navigate to Settings > Elementor in your WP Dashboard, select the Experiments tab, find the Flexbox Container option, set it to active, and save the changes.

The Elementor container might not be showing due to an outdated version of the Elementor plugin. Ensure you have updated to the latest version that supports the Flexbox container feature.

Unlocking Elementor Pro for free is against the terms of service. You must purchase a legitimate license to access the pro features legally and ethically.

Yes, Elementor does have a Flexbox feature, introduced in version 3.6, allowing users to create flexible layouts with ease. You can activate it through the Experiments tab in the Elementor settings.

Post Tags: #Elementor Free#Elementor Guide#Flexbox Container

Best VPN Services Cheapest Hosting converkit convertkit Create Custom Header Credit Cards CRM Software customization tips Customize Elementor Styles Detailed Comparison divi guide divi tips Elementor Error Elementor Guide Elementor mega menu Elementor Pro Elementor Templates Elementor tips email marketing tools Hosting service Insurance Industry integrate Elementor Form Managed hosting Marketing tools comparsions mega menu design NordVPN payment tips Shopify speed optimization tips & trick tools for small business Top CRM System webflow guide Webflow Tips Website builder Website navigations Woocommerce tips WordPress wordpress developer WordPress developer USA Wordpress guide wordpress guides WordPress Maintenance services WordPress plugin Wordpress support

Facebook FacebookTwitter TwitterInstagram InstagramPinterest PinterestYouTube YouTube

© 2025 Mc Starters Blog

  • Guest Posts
  • HTML Sitemap
  • XML Sitemap
  • Affiliate Disclosure
Scroll to top
  • Home
  • Company
    • About Us
    • Meet with Team
    • Media Assets
    • We’re Hiring
    • Contact Us
  • Top Categories
    • WooCommerce
    • Elementor
    • Webflow
    • Divi
    • WordPress
    • SEO
    • Payoneer Guides
    • Shopify Tutorials
    • Squarespace
    • Weebly
    • Wix
    • Website Builders
    • CRM
    • Payment
  • Tips and Tricks
    • AI
    • Business
    • Insurance
    • Resources
    • Review
    • Science and Technology
    • Windows 10
    • Windows 11
  • Services
    • WordPress Web Design
    • Elementor Expert
    • Divi Theme Experts
    • Blog Setup
    • WordPress Customization
    • E-Commerce Websites
    • Crocoblock Expert
    • Hire Webflow Expert
  • Free Templates
    • Elementor Templates
    • Elementor Header
    • Elementor Footer
    • Elementor Single Post Templates
    • Elementor Mega Menu
    • Divi Templates
    • Divi Header Layouts
    • Divi Footer Layout
  • Tools
  • Guest Posts
Facebook X Instagram YouTube Pinterest
Search