How to Rollback to a Previous Version in Elementor: Step-by-Step Guide

Do you want to Rollback to a previous version in Elementor?
A rollback is an important tool that many people are looking for to solve problems. If you are using Elementor Pro\free, you will need to Rollback to a previous version in Elementor.
This blog post will cover all the steps to Rollback to a previous version in Elementor. This step is super easy and it will take no time to rollback to previous versions.
Let’s get started.
Rollback to a Previous Version in Elementor (in 3 steps)
Fellow step-by-step guide to rolling back to the previous version.
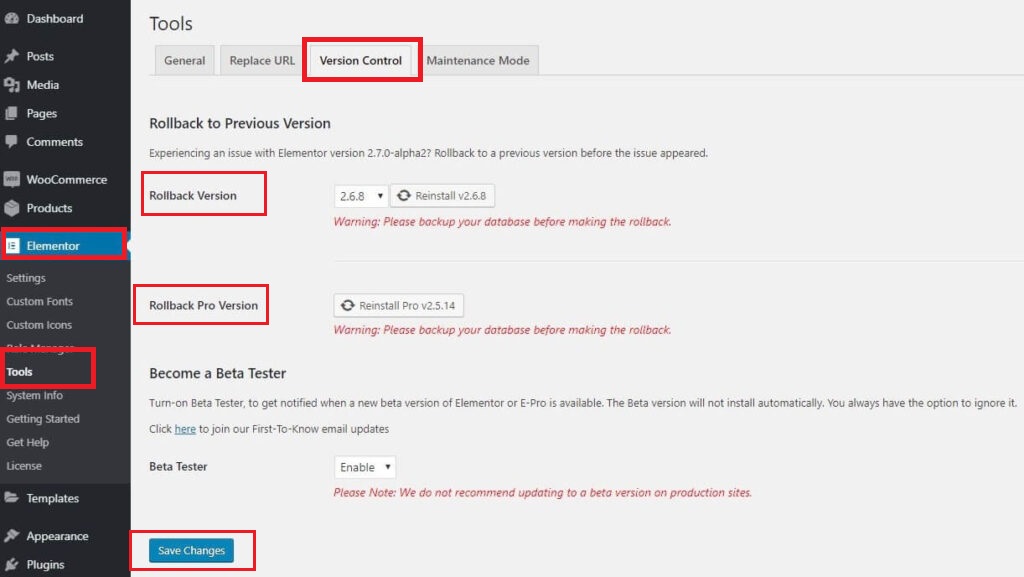
Step 1: Open the WordPress dashboard. Go to the Elementor, and click on the Tools option there.
Step 2: Click the Version Control tab
Step 3: If you are rolling back the free version of Elementor, select the version you would like to revert to, then click its Reinstall button. This will reinstall the specific version you chose. If you are rolling back Elementor Pro, just click its Reinstall button. This will reinstall the last version prior to the installed one.

Important! Always back up your database before making changes such as rolling back.
Conclusion
In conclusion, there are important things you keep in mind before rolling back a previous version. Always take the backup before you make changes. This will keep your website safe, any problem will come after updating the version.
Why would I want to rollback to a previous version in Elementor?
There are several reasons to consider rolling back to a previous Elementor version. It can be necessary if you encounter compatibility issues with your current version, experience bugs, or prefer the features and stability of an older version.
Will I lose my content or settings when I rollback Elementor?
Rolling back Elementor should not affect your content or settings directly. However, it’s essential to back up your website and thoroughly test your site after the rollback to ensure everything functions as expected.


