How to Change Your Webflow Staging Subdomain URL

Are you using webflow for your website development and need to change the web address (URL) of your staging site?
This can be a common requirement, and webflow makes it relatively simple to do. In this blog post, we’ll walk you through the steps to change your webflow staging subdomain URL.
Why Change Your Staging Subdomain URL?
Before we delve into the steps, it’s essential to understand why you might need to change your staging subdomain URL. Here are a few reasons:
- Testing and Development: As you build and improve your website, you may want to create a fresh environment for testing new features or design changes without affecting your live site.
- Project Rebranding: If your website is undergoing a rebranding process, you might want to update the staging subdomain to reflect the new brand name or identity.
- Security and Privacy: Changing the staging subdomain can enhance security by making it more difficult for unauthorized users to access your staging site.
Now, let’s get into the steps to change your webflow staging subdomain URL.
Your work is almost done! Your staging subdomain URL is now updated. You can access your staging site using the new URL you just set. Make sure to test it to ensure it’s working as expected.
That’s it! You’ve successfully changed your webflow staging subdomain URL. This process is straightforward and can be helpful if you need to modify your web address for testing, development, or other purposes.
Change Your Webflow Staging Subdomain URL step by step
Here are the steps to change your webflow staging subdomain URL.
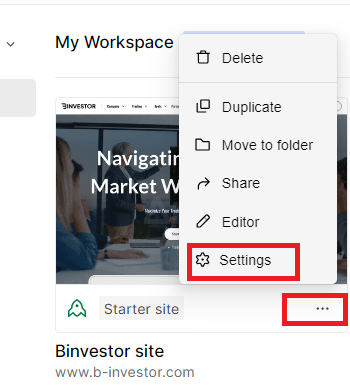
Step 1: Log in to Webflow. Open Site settings

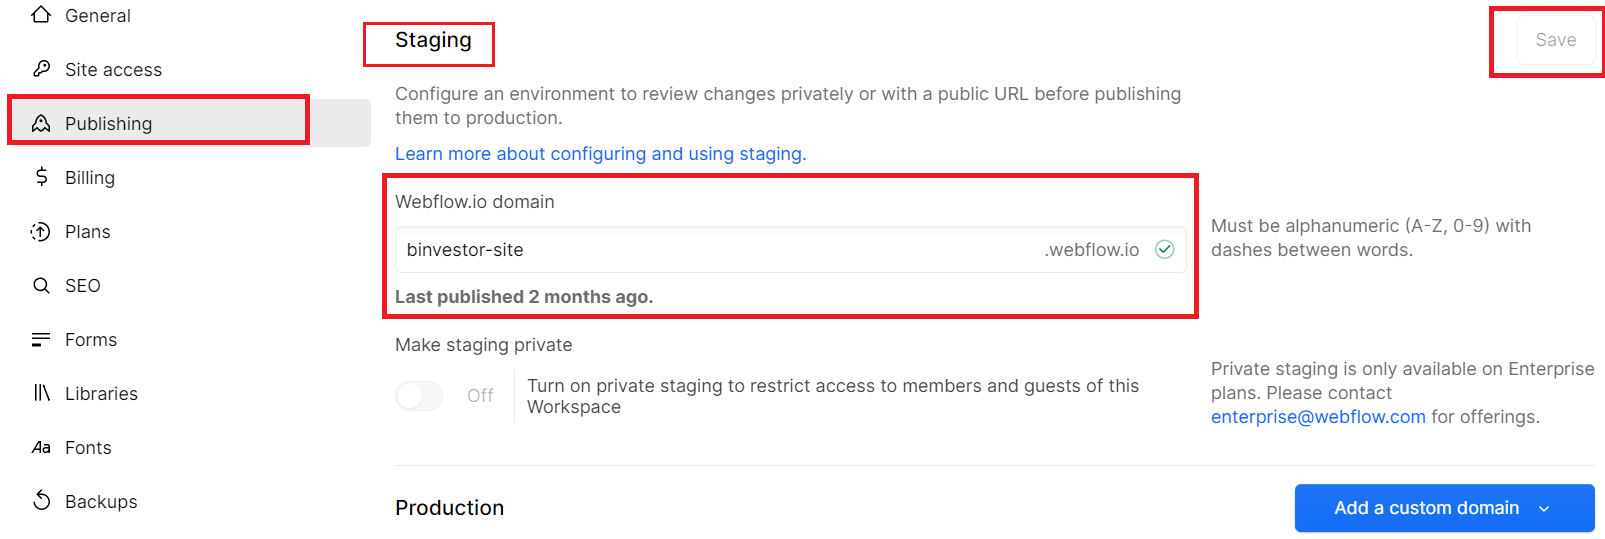
Step 2: Publishing tab > Staging
Step 3: Edit the subdomain, save, and test the new URL.

That’s it! You’ve successfully changed your webflow staging subdomain URL. This process is straightforward and can be helpful if you need to modify your web address for testing, development, or other purposes.
Tips and Considerations
- Keep It Unique: When choosing a new subdomain, ensure it’s unique and not already in use on the webflow platform. You can check the availability before making the change.
- Inform Your Team: If you’re working with a team, make sure to communicate the URL change to ensure everyone is on the same page.
- SEO Impact: Changing your staging subdomain won’t impact your live site’s SEO, but be cautious about making such changes on your production site as they can affect your search engine rankings.
- Custom Domain: If you’re using a custom domain, be aware that this change only affects your webflow subdomain, not the custom domain.
conclusion
In conclusion, changing your Webflow staging subdomain URL is a straightforward process that can be useful for testing and development or adapting to rebranding efforts.
By following these simple steps, you can ensure that your staging site is accessible under a new web address while keeping your main site intact.
If you encounter any issues or have questions, webflow’s support team is readily available to assist. Happy website building and testing!
Can I change the staging subdomain URL multiple times?
Yes, you can change the staging subdomain URL as often as needed. However, it’s essential to consider the impact on your workflow and team communication when making frequent changes.
Does changing the staging subdomain affect my live website?
No, changing the staging subdomain only impacts your staging site. Your live website’s URL remains unaffected by this change.
Can I use a custom domain for my staging site?
webflow’s staging subdomain is separate from custom domains. If you want to use a custom domain for your staging site, you’ll need to set it up separately within your project settings.


