
FlyingPress is a premium WordPress performance plugin that combines caching, image optimization, font delivery, and script control in one tool — and after testing it on a live WooCommerce site, mobile PageSpeed jumped from 86 to 98 with load time dropping to 0.89 seconds. This post covers both halves of the decision: whether FlyingPress is worth buying, and exactly how to configure it once you have.
FlyingPress Review + Complete Setup Guide (2026)
What Is FlyingPress?
FlyingPress was developed by Gijo Varghese, the creator of WP Speed Matters. Unlike WP Rocket, it doesn’t rely on external tools for image optimization or CDN setup — everything ships in one plugin.
Key things to know:
- Works with any WordPress theme or page builder
- Built-in lazy load and image compression
- Supports WebP and AVIF formats
- Powerful JS and CSS optimization features
Why I Switched to FlyingPress
I’d used WP Rocket for years. It worked, but I wanted more control over JavaScript delays, font handling, and image formats — WP Rocket lacked built-in WebP or AVIF support. After switching to FlyingPress, mobile PageSpeed jumped from 84 to 98, LCP and CLS improved, and homepage load time dropped to 0.89 seconds, without a CDN.
What changed:
- WebP images loaded instantly
- No layout shift, thanks to font preloading
- JavaScript delays reduced blocking time
- Unused CSS was completely removed
FlyingPress Features
FlyingPress is a full performance suite, not just a caching plugin:
- Full Page Caching — generates static HTML files so pages load instantly, with intelligent cache invalidation when content changes.
- Browser Caching — stores CSS, JS, and images locally in the visitor’s browser for faster repeat visits.
- Lazy Load for Images & iFrames — delays off-screen content until the visitor scrolls to it, using native lazy loading plus a fade-in for smoother UX.
- Image Optimization (WebP/AVIF) — auto-converts images to smaller modern formats and resizes to fit the display size.
- Font Optimization — preloads fonts, supports self-hosted Google Fonts, and sets font-display: swap to improve LCP.
- JavaScript Execution Delay — defers non-critical scripts until user interaction, reducing Time to Interactive.
- Remove Unused CSS — scans each page and strips CSS that isn’t used, with a fallback if detection fails.
- Minify & Combine Files — reduces the number of HTTP requests and Total Blocking Time.
- Built-in CDN Support — integrates with BunnyCDN, Cloudflare, or any custom CDN; FlyingCDN is available as an optional add-on with AVIF delivery.
- Preload & Cache Warmup — preloads pages from your sitemap so even first-time visitors hit a warm cache.
- Database Optimization — cleans post revisions, spam comments, and transients on a schedule.
- Critical CSS Generation — loads essential styles first per page to improve perceived load time and reduce CLS.
Real Performance Test
Tested on a live WooCommerce site using Astra and Elementor:
Before FlyingPress:
- Mobile PageSpeed Score: 86
- LCP: 3.2s
- Load Time: 1.6s
After FlyingPress (with CDN enabled):
- Mobile PageSpeed Score: 98
- LCP: 1.2s
- Load Time: 0.89s
Other improvements: 42% reduction in JavaScript blocking time, CLS dropped below 0.05, total page size dropped by 30%.
Ease of Use
FlyingPress has a simple, tab-based dashboard with tooltips and suggested defaults on every setting — no developer background required. Unlike WP Rocket, its more advanced options are shown clearly rather than hidden behind extra toggles or code snippets. Setup takes under 10 minutes for the defaults; the setup guide in Part 2 covers the settings worth going beyond default on.
FlyingPress Pricing (2026)
FlyingPress is a paid plugin with no free tier:
| Plan | Price | Sites |
|---|---|---|
| Personal | $60/year | 1 site |
| Developer | $150/year | 5 sites |
| Agency | $250/year | 50 sites |
All plans include every feature, one year of updates and support, and built-in image optimization (no need for a separate tool like Imagify or ShortPixel).
Pros and Cons
Pros:
- Excellent PageSpeed and Core Web Vitals performance
- Built-in image and font optimization
- Detailed JS and CSS control
- Works well with any theme or builder
Cons:
- No free version
- Slight learning curve for the advanced features covered in Part 2
- Requires careful setup on heavily dynamic sites
- FlyingCDN is optional but adds cost
Verdict
FlyingPress goes beyond basic caching into a genuinely full performance suite. If you care about fast load times, Core Web Vitals, and clean front-end code — whether you’re a developer, an agency, or just a site owner tired of a slow WordPress site — it’s worth the investment. The features that earn the highest scores, though, aren’t the defaults; they need the configuration covered below.
Not Sure FlyingPress Is the Right Fit?
If you’re weighing FlyingPress against WP Rocket or want a second opinion before buying, talk to a WordPress expert who’s set up both on real client sites.
The Complete Setup Guide
The settings that push a site from “decent” to a 90+ PageSpeed score aren’t switched on by default — they’re the ones you configure deliberately, test, and sometimes add specific exclusions for. This section walks through every settings tab in order.
Before You Touch a Single Setting
- Take a full backup. Caching plugins touch how HTML, CSS, and JS get served — if something conflicts with your theme or another plugin, you want an easy way back.
- Test on staging if available. Not required, but click through your key pages — homepage, a blog post, a product page, and your checkout/contact form — before pushing to production.
After every change below, the same rule applies: save the setting → clear the FlyingPress cache → reload the page in an incognito window and confirm nothing broke before moving to the next toggle. Configuring everything at once makes it much harder to know which setting caused an issue if one shows up.
Step 1: Installation and Initial Connection
- Purchase a license from the official FlyingPress site and download the plugin ZIP.
- In WordPress, go to Plugins → Add New → Upload Plugin, upload the ZIP, and activate it.
- Enter your license key when prompted to connect the plugin to your account.
- FlyingPress adds a FlyingPress menu item in your WordPress admin sidebar — that’s your control panel for every setting below.
Step 2: Cache Settings
- Enable Cache — turn this on first; it’s what generates the static HTML files.
- Cache Lifespan — the default is fine for most sites; lower it if you publish very frequently.
- Preload Cache — enable this. It crawls your sitemap and pre-builds cached pages so even a visitor’s first load hits a warm cache.
- Preload Links on Hover — enable for extra perceived speed; FlyingPress starts preloading a link’s destination the moment a visitor hovers over it.
- Separate Cache for Mobile — enable if your site shows or hides content differently on mobile (common with responsive menus or conditional Elementor sections), so mobile and desktop visitors don’t get served the wrong cached layout.
Test: load your homepage twice in a row in an incognito window — the second load should feel instant.
Step 3: Preload Settings
- Preload Cache via Sitemap — point this at your actual XML sitemap (Rank Math or Yoast will already have generated one).
- Preload After Cache Clear — enable this so FlyingPress immediately starts rebuilding the cache after you publish new content, rather than leaving the site cold.
Step 4: Render-Blocking Resources (CSS & JS)
This is where the biggest performance gains — and the biggest risk of visually breaking something — live. Go one setting at a time here.
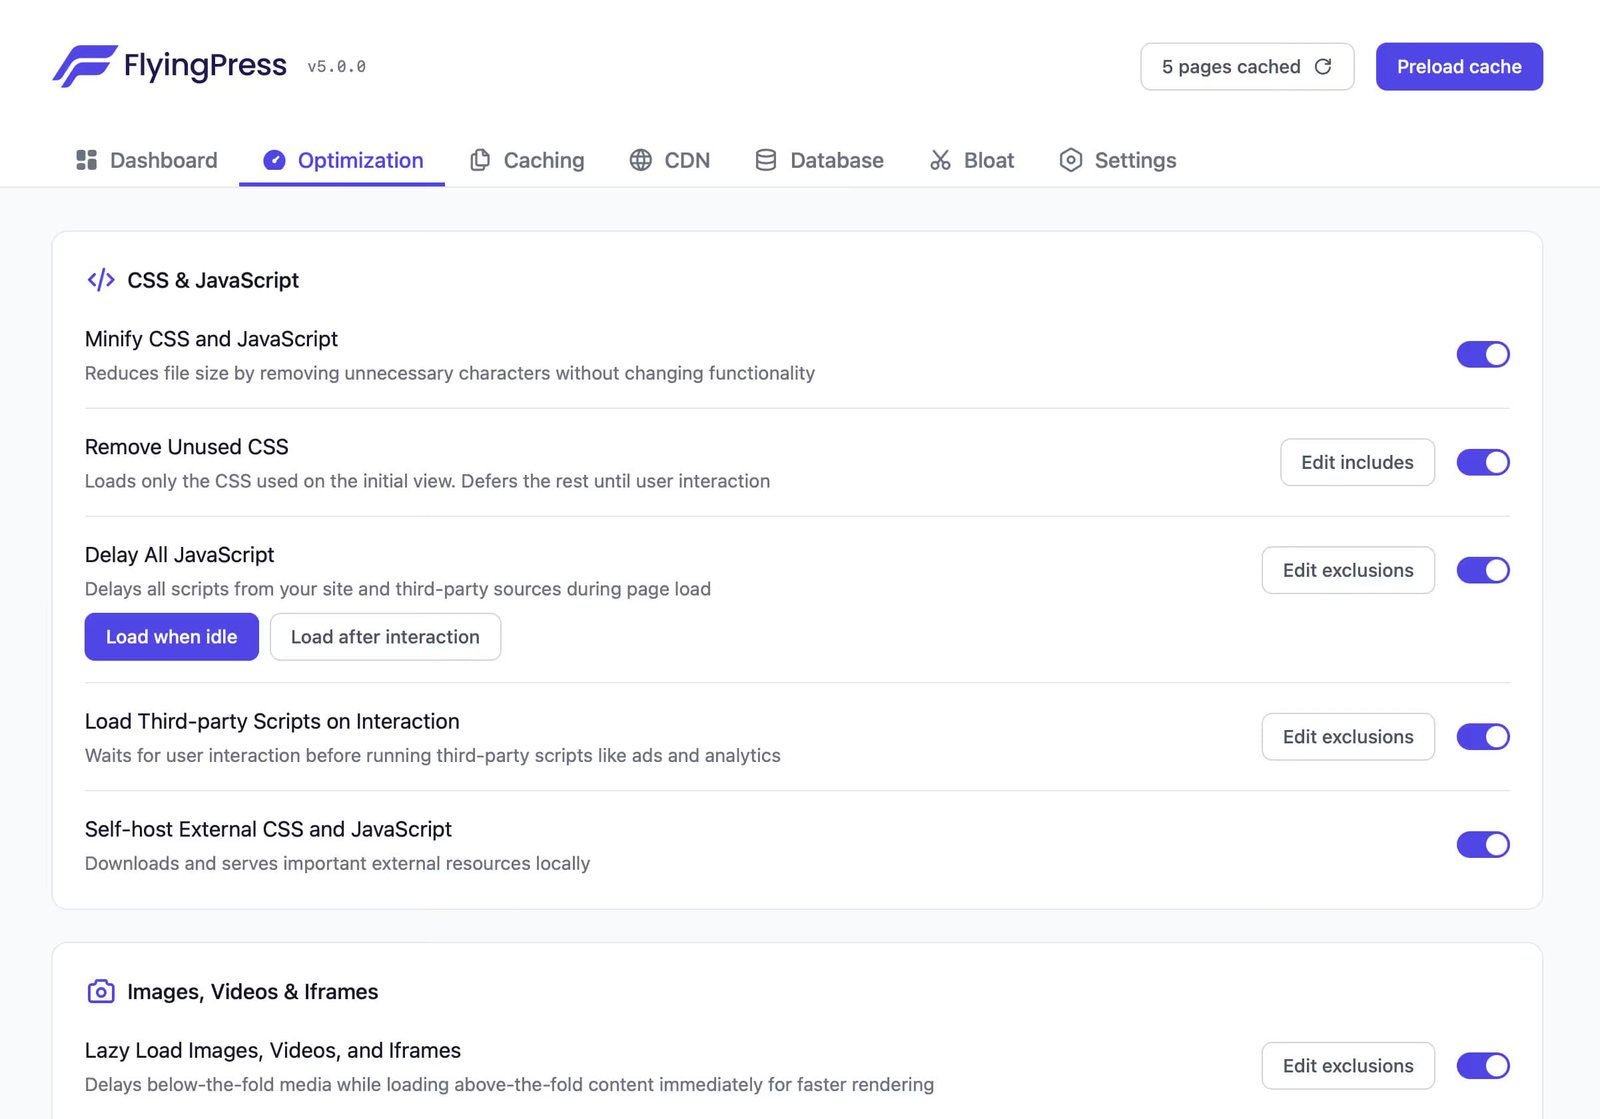
- Remove Unused CSS — one of FlyingPress’s strongest features. Enable it, then click through your key templates looking for missing styles or broken layouts. If something looks wrong, whitelist the specific selector in the exclusions field.
- Delay JavaScript Execution — defers non-critical scripts until user interaction. This is the setting most likely to break something if you skip testing: if a form, slider, or payment button depends on a script loading immediately, delaying it can make that element briefly unresponsive. Test every interactive element — forms, “Add to Cart,” sliders, accordions, live chat — after enabling this.
- Minify CSS/JS — safe to enable on almost every site.
- Combine CSS/JS — test this specifically with your page builder, since builders sometimes rely on script load order.
Test: open your browser console on your homepage and a form page, confirm no red JavaScript errors, before moving on.
Step 5: Lazy Load
- Lazy Load Images — enable; images below the fold won’t load until the visitor scrolls near them.
- Lazy Load iFrames — enable, particularly for embedded YouTube videos or map embeds.
- Exclude Above-the-Fold Images — add your logo and hero image to the exclusions field. Delaying the very first thing a visitor sees can hurt your LCP score rather than help it.
Step 6: Image Optimization
- Enable WebP/AVIF Conversion — turn this on; FlyingPress serves modern, smaller formats to browsers that support them.
- Resize Images to Fit Container — enable so images are served at the size they’re actually displayed, not full resolution scaled down with CSS.
- Compression Level — the default balance works for most sites; lower it slightly for photography-heavy portfolios.
Step 7: Font Optimization
- Preload Fonts — enable to reduce layout shift as text renders.
- Self-Host Google Fonts — enable if you use Google Fonts; avoids an external DNS lookup and can help both speed and privacy compliance.
- font-display: swap — verify this is active; it shows fallback text immediately rather than leaving blank space, directly helping LCP.
Step 8: CDN Setup
- If you already use Cloudflare, BunnyCDN, or another CDN, connect it by entering your CDN URL.
- If not, FlyingPress’s own FlyingCDN add-on (powered by BunnyCDN) is a one-click option that also adds AVIF delivery.
- Optional but most valuable if your visitors are geographically spread out; skip it if traffic is concentrated near your hosting server.
Step 9: Database Optimization
- Clean Post Revisions, Spam Comments and Trash, and Transients — enable a weekly automatic schedule for each. Lightweight enough not to need manual oversight.
Recommended Settings by Site Type
| Setting | Simple blog/portfolio | Elementor/Divi business site | WooCommerce store |
|---|---|---|---|
| Remove Unused CSS | Enable | Enable, test template-by-template | Enable, test cart/checkout carefully |
| Delay JS Execution | Enable | Enable, test forms and sliders | Test add-to-cart and checkout thoroughly first |
| Separate Mobile Cache | Optional | Enable if mobile menu differs | Enable |
| Lazy Load Images | Enable | Enable, exclude hero image | Enable, exclude first product image row |
| CDN | Optional | Recommended for global audiences | Recommended |
| Preload Cache | Enable | Enable | Enable |
Testing Your Setup After Configuration
- Google PageSpeed Insights (mobile and desktop) on your homepage and one inner page.
- GTmetrix for a second data point and a visual waterfall of what’s still loading slowly.
- Manual click-through of every form, button, slider, and menu on desktop and mobile — this catches issues automated speed tools won’t flag.
- Re-check after major content updates. A new widget or plugin can reintroduce a script that needs its own exclusion rule.
Common Setup Mistakes to Avoid
- Enabling everything at once instead of one group at a time, making it hard to trace what broke.
- Skipping the exclusions field — nearly every “FlyingPress broke my site” report traces back to a script or class that needed excluding and wasn’t.
- Forgetting to clear cache after theme or plugin updates, which can serve an outdated page even after a fix.
- Not testing mobile separately, especially with Separate Mobile Cache enabled.
- Skipping the checkout flow test on WooCommerce sites — the highest-stakes page to verify after any caching change.
Conclusion
FlyingPress earns its reputation as a genuinely full performance suite rather than a basic caching plugin — the 86-to-98 PageSpeed jump and sub-second load time in testing back that up. But those numbers came from deliberate configuration, not the out-of-the-box defaults. Work through Remove Unused CSS, Delay JavaScript Execution, and properly scoped lazy-load exclusions one at a time, test after each change rather than all at once, and pay special attention to interactive elements like forms and checkout rather than just the PageSpeed number. Do that, and the results in this review are genuinely achievable on your own site.
Get Your Site Speed Fixed, Not Just Configured
If FlyingPress settings alone aren’t closing the gap, the bottleneck might be hosting, theme bloat, or unoptimized code rather than the caching plugin itself. We handle full site speed audits.
FAQ
Is FlyingPress better than WP Rocket?
Yes, in terms of performance and features. FlyingPress supports AVIF, WebP, font loading, and more granular JS control, without needing external tools for image optimization or CDN setup.
Does FlyingPress offer image compression?
Yes — WebP/AVIF generation and responsive image resizing are built in, with no need for a separate plugin like Imagify or ShortPixel.
Is FlyingPress beginner-friendly to set up?
Yes for the defaults — setup takes under 10 minutes with tooltips guiding each setting. Getting the highest scores does require going beyond default on a few settings, covered in the setup guide above.
What are the best FlyingPress settings for Elementor?
Enable Remove Unused CSS, Delay JS Execution, and Lazy Load, then test every Elementor widget with interactive behavior (sliders, popups, forms, accordions) individually, since Elementor’s own scripts sometimes need specific exclusions added.
Will FlyingPress break my WooCommerce checkout?
It can if Delay JavaScript Execution or Remove Unused CSS strip something your payment gateway or cart script depends on. Always test the full checkout flow — not just the PageSpeed score — after enabling these settings on a store.
Do I need a CDN to use FlyingPress?
No. CDN setup is optional and adds the most value if your visitors are geographically spread out. A site with a concentrated local audience close to its hosting server will see a smaller CDN benefit.
What’s the most common mistake when setting up FlyingPress?
Enabling every setting at once instead of one group at a time. When something breaks, you won’t know which toggle caused it — nearly every “broken site” report traces back to skipping the per-setting testing step.