Skip to content
Mc Starters Main Logo Circle
  • Home
  • CompanyExpand
    • About Us
    • Meet with Team
    • Media Assets
    • We’re Hiring
    • Offers
    • Sidebar Advertisement
    • Sponsored Post
    • Guest Posts
    • Link Insertion
    • Contact Us
  • Top CategoriesExpand
    • WooCommerce
    • Elementor
    • Webflow
    • Divi
    • WordPress
    • SEO
    • Payoneer Guides
    • Shopify Tutorials
    • Squarespace
    • Weebly
    • Wix
    • Website Builders
    • CRM
    • Payment
  • Tips and TricksExpand
    • AI
    • Business
    • Insurance
    • Resources
    • Review
    • Science and Technology
    • Windows 10
    • Windows 11
  • ServicesExpand
    • WordPress Web Design
    • Elementor Expert
    • Divi Theme Experts
    • Blog Setup
    • WordPress Customization
    • E-Commerce Websites
    • Crocoblock Expert
    • Hire Webflow Expert
  • Free TemplatesExpand
    • Elementor Templates
    • Elementor Header
    • Elementor Footer
    • Elementor Single Post Templates
    • Elementor Mega Menu
    • Divi Templates
    • Divi Header Layouts
    • Divi Footer Layout
  • Tools

Lifetime Pro Access to Elementor & Divi Templates

Grab deal
Mc Starters Main Logo Circle
Home / Webflow Tutorials / How to Migrate from WordPress to Webflow CMS
How to Migrate from WordPress to Webflow CMS

Published By :Mudassar Shakeel April 26, 2023March 15, 2024 Webflow Tutorials
How to Migrate from WordPress to Webflow CMS 2

Migrating from WordPress to Webflow CMS can seem like a daunting task, but it doesn’t have to be. With the right approach and tools, the transition can be smooth and painless. In this post, we will go over the steps to migrate your website from WordPress to Webflow CMS.

Hire a freelance webflow expert for web designing

Step 1: Create a Backup of Your WordPress Website
Before you start migrating your website, it is crucial to create a backup of your WordPress website. This backup will help you to restore your website in case anything goes wrong during the migration process. You can use a plugin like UpdraftPlus or BackupBuddy to create a backup of your website.

Export Your WordPress Content

Step 2: Install and activate Plugin “Export any WordPress data to XML/CSV“

WP All Export is a tool that can help you move information from one place to another easily. It has a simple process that only has three steps, and it is easy to use because you can drag and drop things where you need them to go. You can use WP All Export to do things like edit data, move content from one website to another, create a list of things people bought from a certain website, and more!
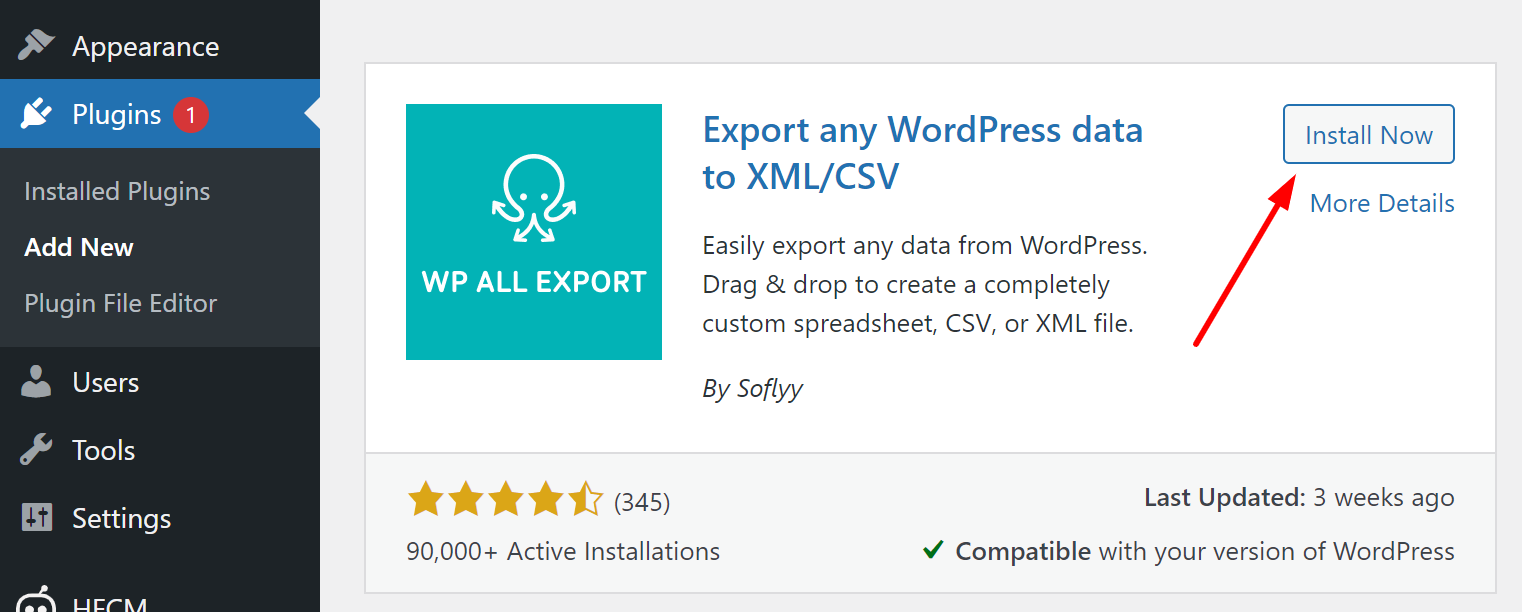
Export-any-WordPress-data-to-XML

Step 3: To make sure you only export the content you want, you have to go to the All Export settings. This is where you can tell the tool what content to leave out of your export.
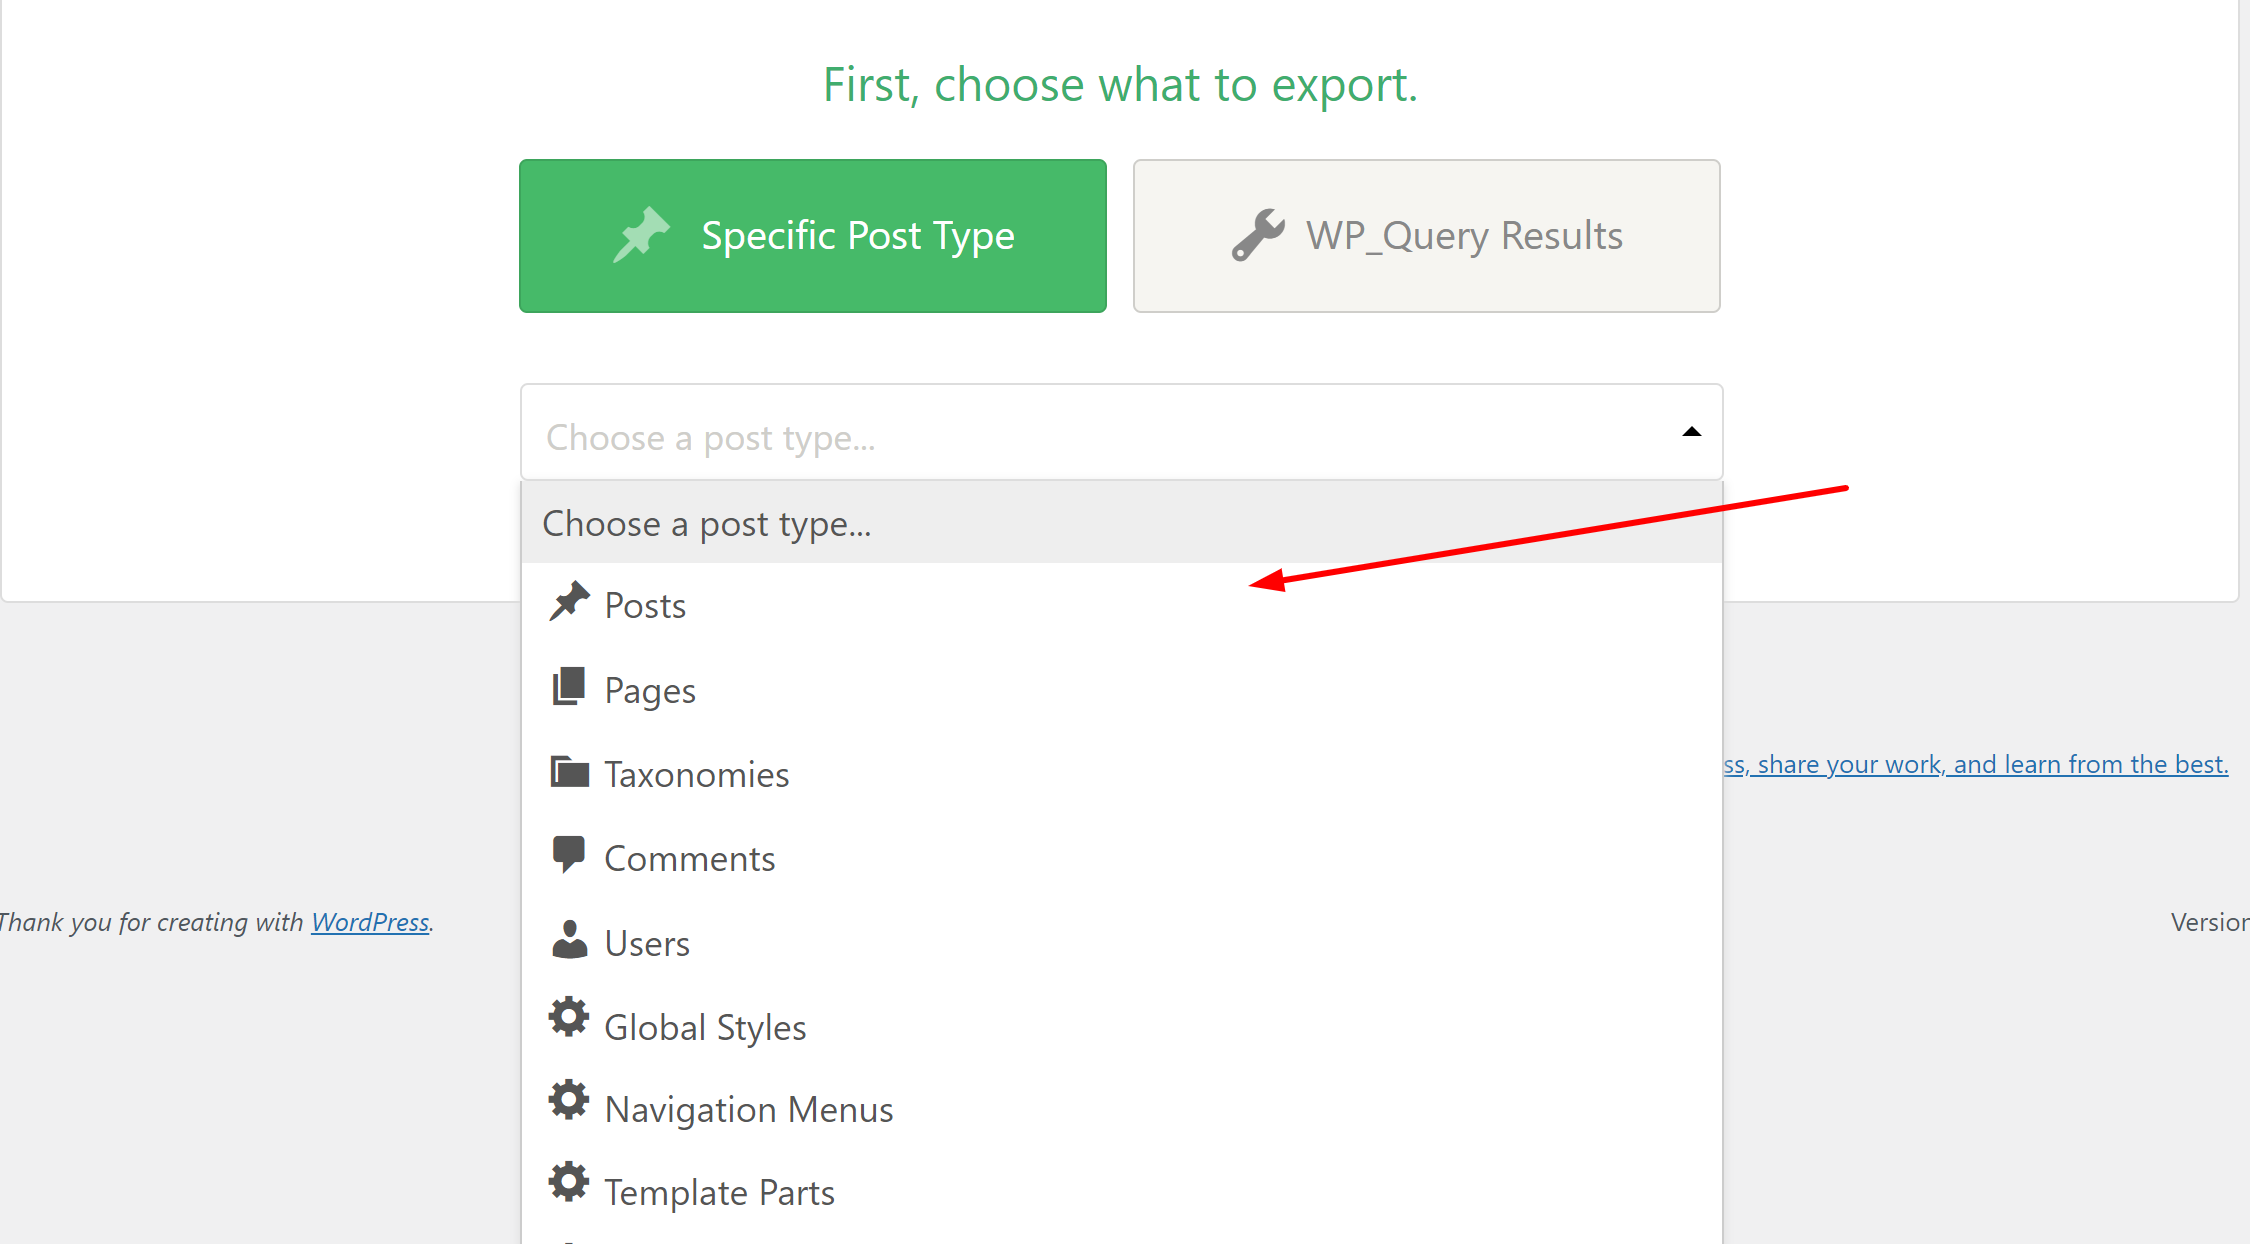
select-specific-post

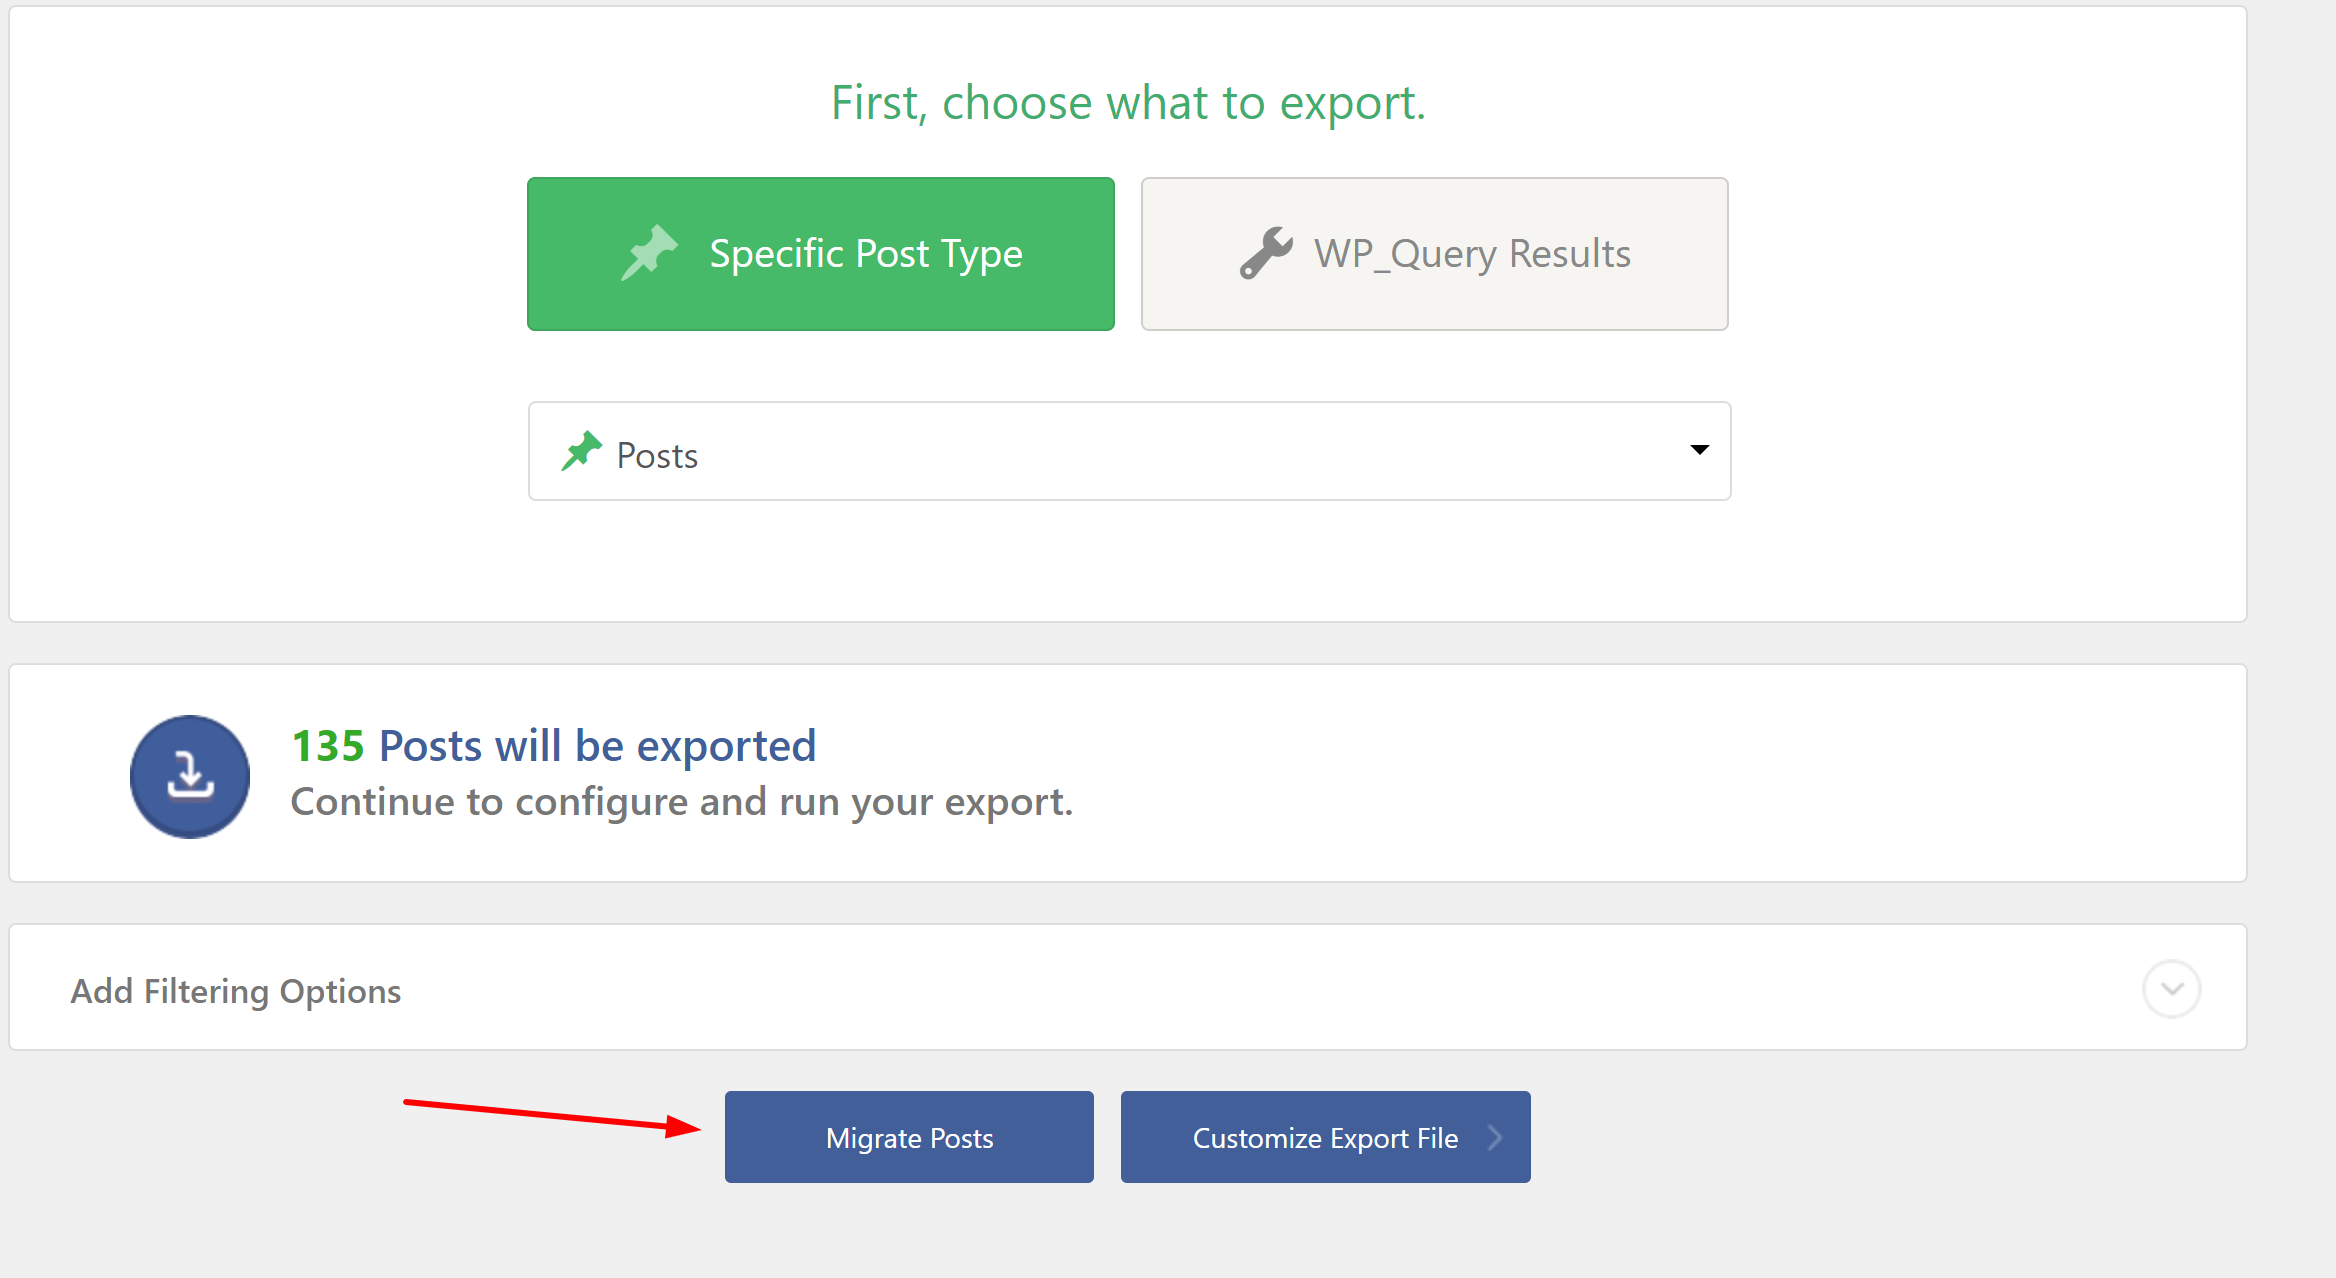
Step 4: Once you configure your export settings. You can click the Migrate Posts button. This will start the process of moving the content to where you want it to go.
See also  The importance of accessibility in website design and how Webflow can help
migrate-posts

Step 5: Now click on Confirm & Run Export.

confirm-and-run-export

Step 6: For download, Click on CSV.

download

Import your CSV into Webflow


If you haven’t already, you will need to sign up for a Webflow CMS account. You can choose from several pricing plans based on your needs. Once you’ve signed up, you will need to create a new project for your migrated website.


Now it’s time to import your WordPress content into Webflow CMS.

Step 7: To do this, go to the Webflow CMS dashboard
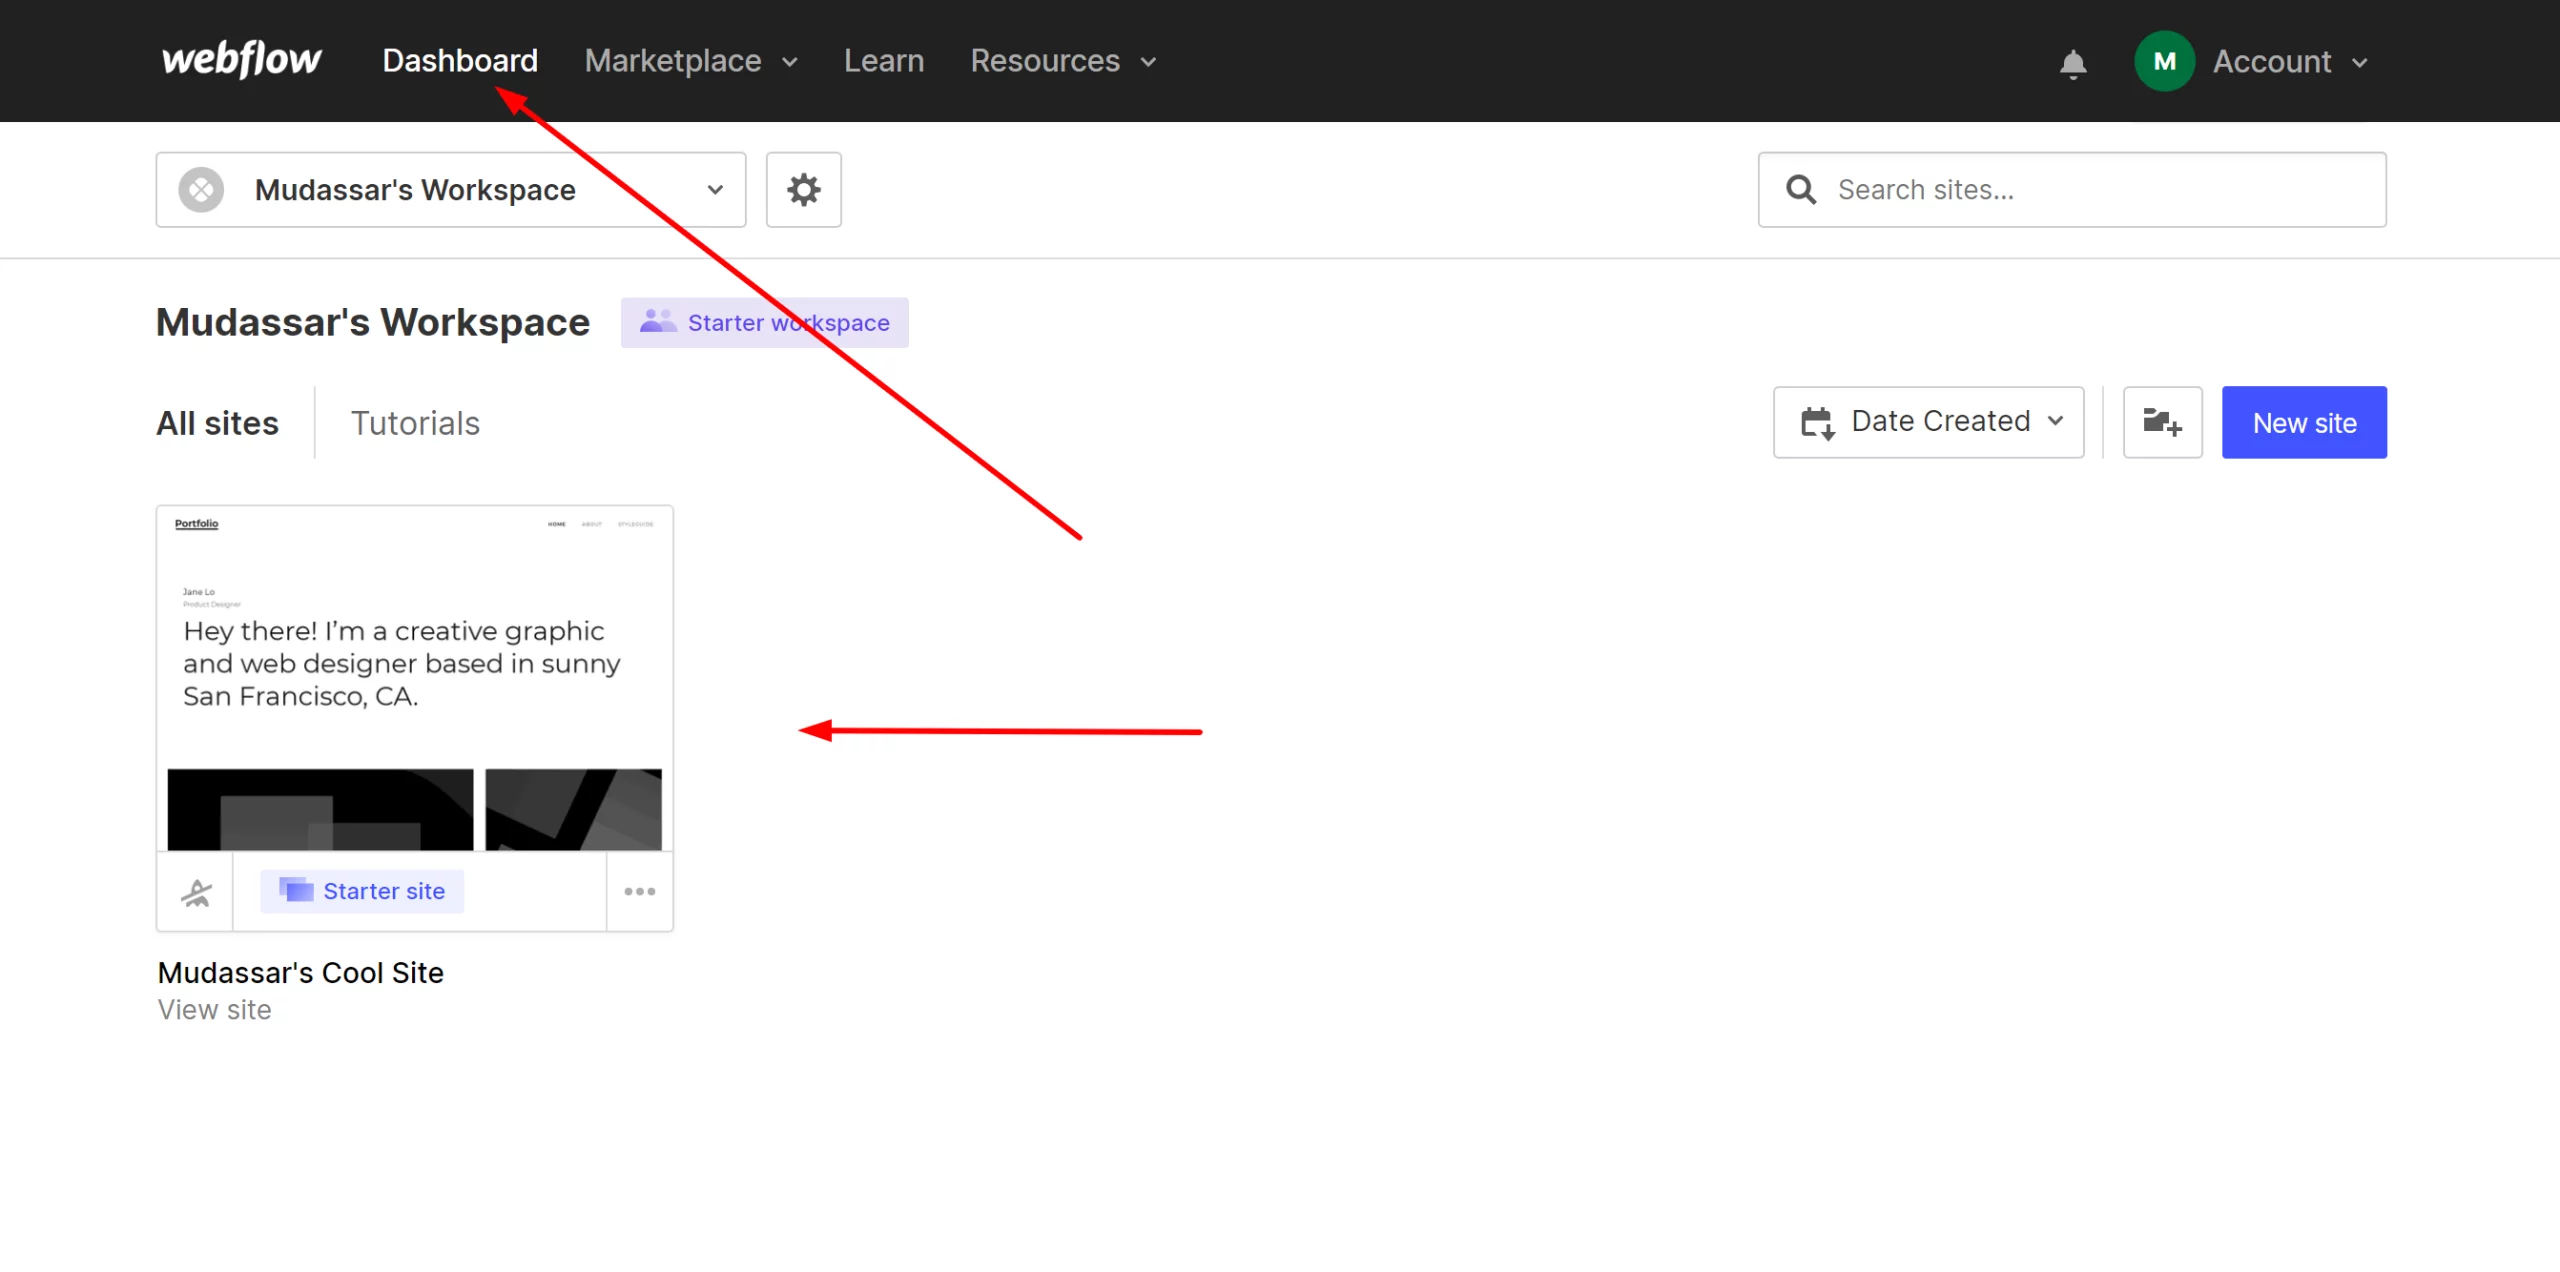
webflow dashboard

Step 8: Click on the “Collections” tab, and then click on “Import Collection.”
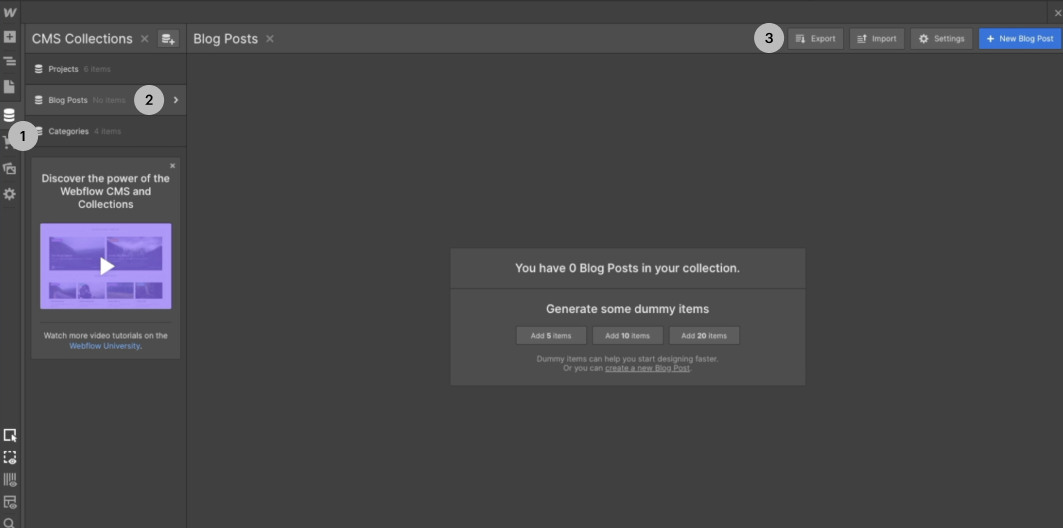
Migrate from WordPress to Webflow CMS

Step 9: From there, you can upload the XML file you exported from WordPress in Step 6.

Step 10: Set Up Your Webflow CMS Design
Once your WordPress content is imported, it’s time to set up your Webflow CMS design. Webflow CMS provides a powerful visual editor that allows you to customize your website’s design without having to write any code. You can create custom layouts, add widgets, and customize your website’s style.

Step 11: Publish Your Webflow CMS Website
Once you’ve finished setting up your Webflow CMS design, it’s time to publish your website. You can do this by clicking on the “Publish” button in the top right corner of the Webflow CMS dashboard. Your website is now live!

10 best Webflow templates of the year 2023

Step 12: Redirect Your Domain to Your New Webflow CMS Website
Finally, you need to redirect your domain to your new Webflow CMS website. You can do this by updating your domain’s DNS settings to point to your new Webflow CMS website’s IP address. If you’re not sure how to do this, you can contact your domain registrar or hosting provider for assistance.

See also  How to add a Menu and Dropdown Menu in Shopify?

Conclusion

In conclusion, migrating from WordPress to Webflow CMS can be a bit of work, but it’s definitely worth it if you’re looking for a more powerful and customizable CMS. By following the steps outlined in this post, you can successfully migrate your website from WordPress to Webflow CMS with ease.

You might also interested about The importance of accessibility in website design and how Webflow can help.

Mudassar - WordPress Developer - get 50% off.

Post Tags: #Website builder

Best VPN Services Cheapest Hosting converkit convertkit Create Custom Header Credit Cards CRM Software customization tips Customize Elementor Styles Detailed Comparison divi guide divi tips Elementor Error Elementor Guide Elementor mega menu Elementor Pro Elementor Templates Elementor tips email marketing tools Hosting service Insurance Industry integrate Elementor Form Managed hosting Marketing tools comparsions New Features NordVPN payment tips Shopify tips & trick tools for small business Top CRM System webflow guide Webflow site Webflow Tips Website builder Woocommerce tips WordPress wordpress developer WordPress developer USA Wordpress guide wordpress guides WordPress Hosting WordPress Maintenance services WordPress plugin Wordpress support

Facebook FacebookTwitter TwitterInstagram InstagramPinterest PinterestYouTube YouTube

© 2025 MC Starters Blog

  • HTML Sitemap
  • XML Sitemap
  • Affiliate Disclosure
Scroll to top
  • Home
  • Company
    • About Us
    • Meet with Team
    • Media Assets
    • We’re Hiring
    • Offers
    • Sidebar Advertisement
    • Sponsored Post
    • Guest Posts
    • Link Insertion
    • Contact Us
  • Top Categories
    • WooCommerce
    • Elementor
    • Webflow
    • Divi
    • WordPress
    • SEO
    • Payoneer Guides
    • Shopify Tutorials
    • Squarespace
    • Weebly
    • Wix
    • Website Builders
    • CRM
    • Payment
  • Tips and Tricks
    • AI
    • Business
    • Insurance
    • Resources
    • Review
    • Science and Technology
    • Windows 10
    • Windows 11
  • Services
    • WordPress Web Design
    • Elementor Expert
    • Divi Theme Experts
    • Blog Setup
    • WordPress Customization
    • E-Commerce Websites
    • Crocoblock Expert
    • Hire Webflow Expert
  • Free Templates
    • Elementor Templates
    • Elementor Header
    • Elementor Footer
    • Elementor Single Post Templates
    • Elementor Mega Menu
    • Divi Templates
    • Divi Header Layouts
    • Divi Footer Layout
  • Tools
Facebook X Instagram YouTube Pinterest
Search