How To Create Payoneer Account
Know Quickly:
- 1st Collect All Documents such as ID Card and Bank Account Details (IBAN)
- 2nd Add 100% correct details in payoneer signup fields.
- 3rd Add Security Details
- 4th Add Bank Account Information
- 5th Do Payoneer account verification
Today we will complete step by step guide on how to create Payoneer account in 2024.
Payoneer is a New York-based financial services company specializing in instant online money transfers and digital payments. Bloggers and freelancers around the world use this mode to get paid. Payoneer is a great PayPal alternative because it offers lower transaction fees and more security.
In addition, if you have a Payoneer Account, Payoneer will provide you with a free MasterCard. This Payoneer MasterCard can be used to withdraw cash from any ATM machine. Payoneer is a payment method used by many multinational corporations such as Google, Amazon, Airbnb, Upwork, and Firefox.
Payoneer features
Freelancers and business owners prefer Payoneer only because of the features I will list below.
- Easy to Integrate with freelancing platforms such as upwork & Fiverr.
- Business owners pay easily to employees using Payoneer.
- Multi-Currency Support.
- Receive Payments and Funds Withdrawal.
- Devices Supported: Web-based, iOS, and Android apps.
- Support Types: Online Chat and Phone Number.
Learn How To Create Payoneer account Step By Step 2022
Please follow every step to make a Payoneer account and make sure to put every information 100% correct when starting to create a Payoneer account.
Make Sure You Put Everything 100% Correct.
Click Here To Start Payoneer Registration.
Collect Documents for creating Payoneer Account
Step 1: Collect all Documents required for creating Payoneer.
- ID Card( Take a Picture of ID Card from Front and Back ) View Sample
- Other Bank Account Details ( Bank account with same ID Card Name)
- IBAN number of Bank Account ( You find in Cheque book ) View Sample
- Full Name, Date of birth( Same as the ID Card 💳)
- Full Residential Address ( Same available on ID Card)
- Email Address and Phone number (Used For Verification Purposes)
Account Sign Up
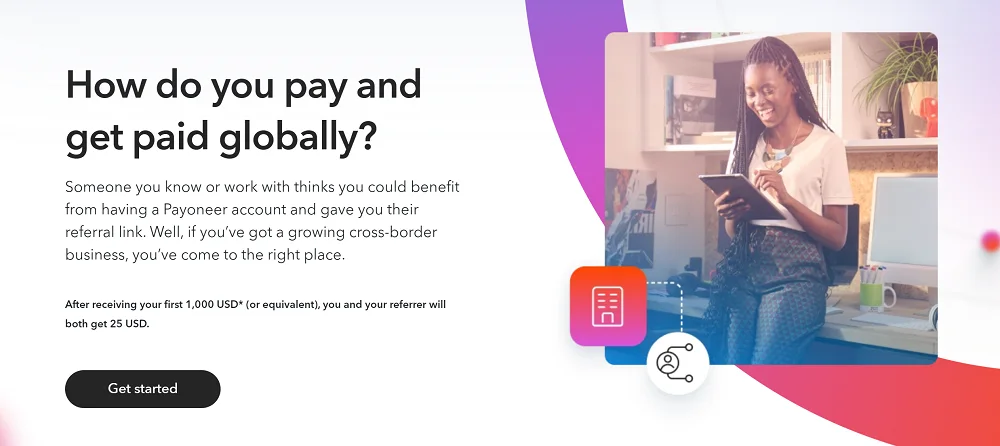
Step 2: Click on the Account Sign-Up and Earn $25.
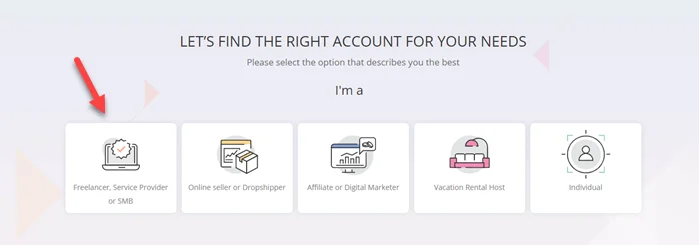
Step 3: If you are a freelancer then click on “Freelancer, Service Provider, or SMB“.
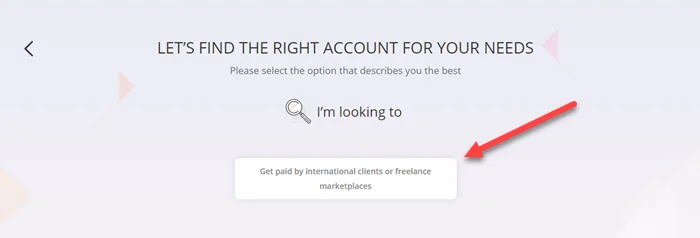
Step 4: Here just click on “Get paid international clients or freelance marketplaces“.
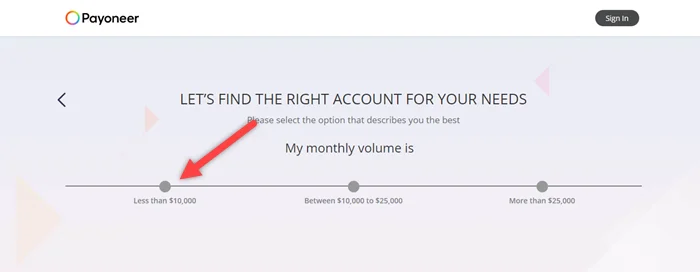
Step 5: Now pick “My Monthly Volume is” less than $10,000.
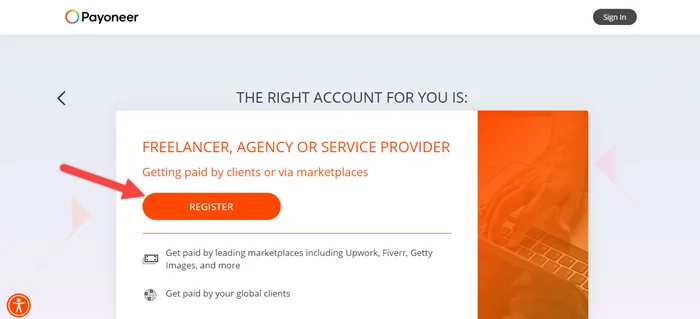
Step 6: In this step click on the “Register” button. The actual registration process will now begin. Fill in the business type and personal information below.
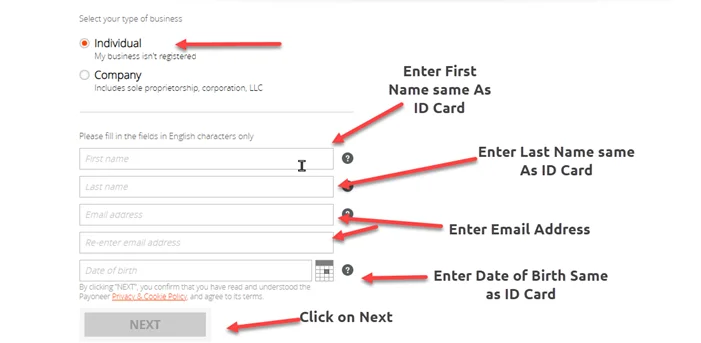
Getting Started – Payoneer Sign Up
Step 7: Now select account type Individual and enter 100% correct details in every field such as
- Enter your First Name and Last Name ( Same as your ID Card ).
- Enter the Same Email address two times ( Learn how to make Gmail Account ).
- Put Date of Birth ( Same as ID Card ).
- Last click on “Next“
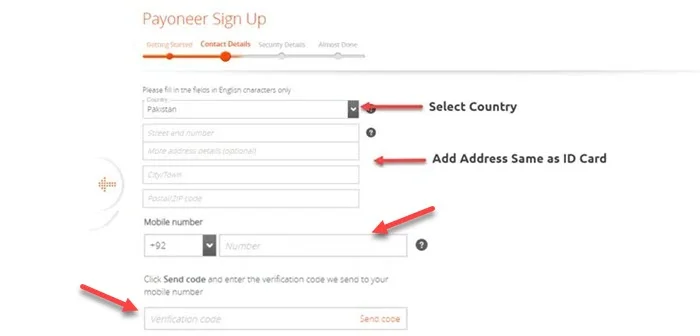
Contact Details – Create Payoneer Account
Step 8: Now It’s time to enter “Contact Details” in Payoneer.
- Select Country ( Same As ID Card ).
- Enter Street Address into Fields ( Same As ID Card ).
- Put City Name and Postal / Zip Code.
- Enter your working mobile number.
- Click on the below button ” Send Code”.
- Enter the Verification Code in the field.
- Last Click on “Next“.
Security Details
Step 9: Now on the next page, you need to fill in some “ Security Details“.
- Enter a strong password ( Don’t Forget Password ).
- Choose a security question then enter answers.
- Enter the ID Card number ( carefully put it in the field ).
- Enter your First & Last name in the Local Language ( Use Google Translators ).
- Put captcha latter input filed.
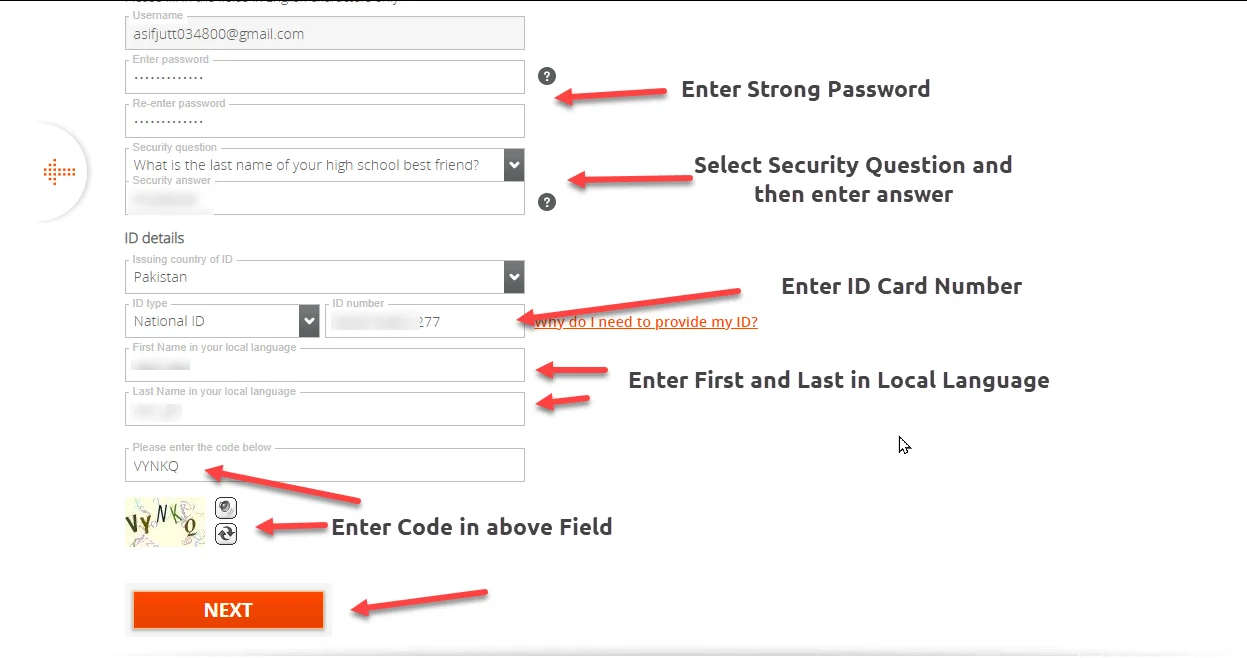
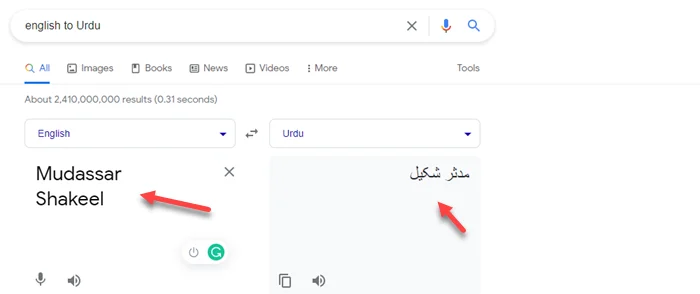
Bank Information Section
Step 10: In this step, we enter bank details to create a Payoneer account and use it to withdraw money from Payoneer.
- Enter Bank Name
- Put Account Holder Name ( Same As ID Card & Payoneer Account ).
- Enter the IBAN number. ( You find in Cheque book ) View Sample Or go to google and search Meezan Bank IBAN generator online. you can replace meezan bank with your bank name. enter account number and generate IBAN.
- Tick mark both ” I agree” checkboxes.
- Click on Submit.
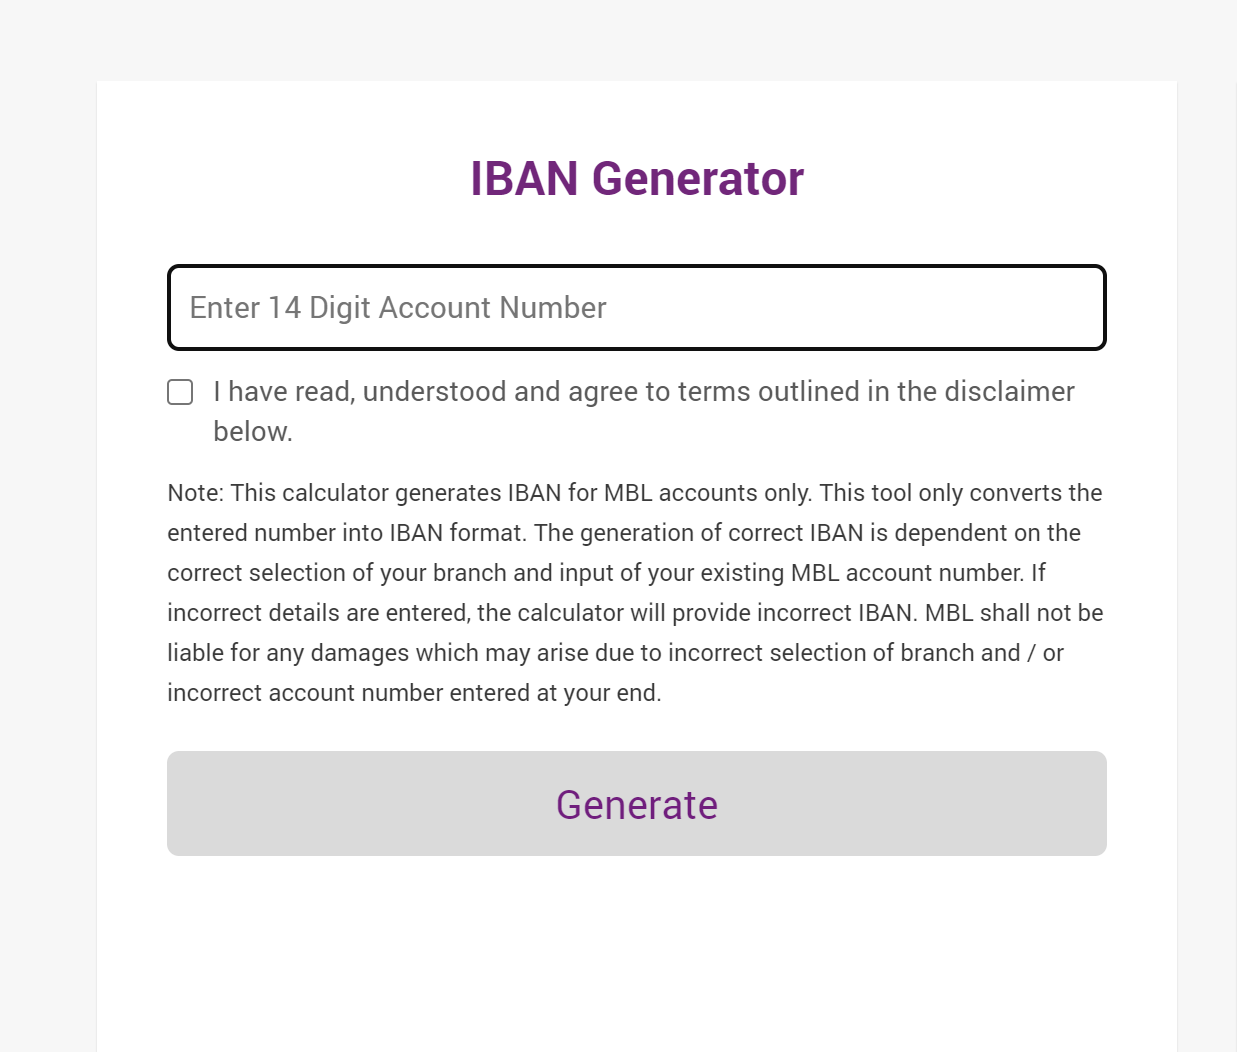
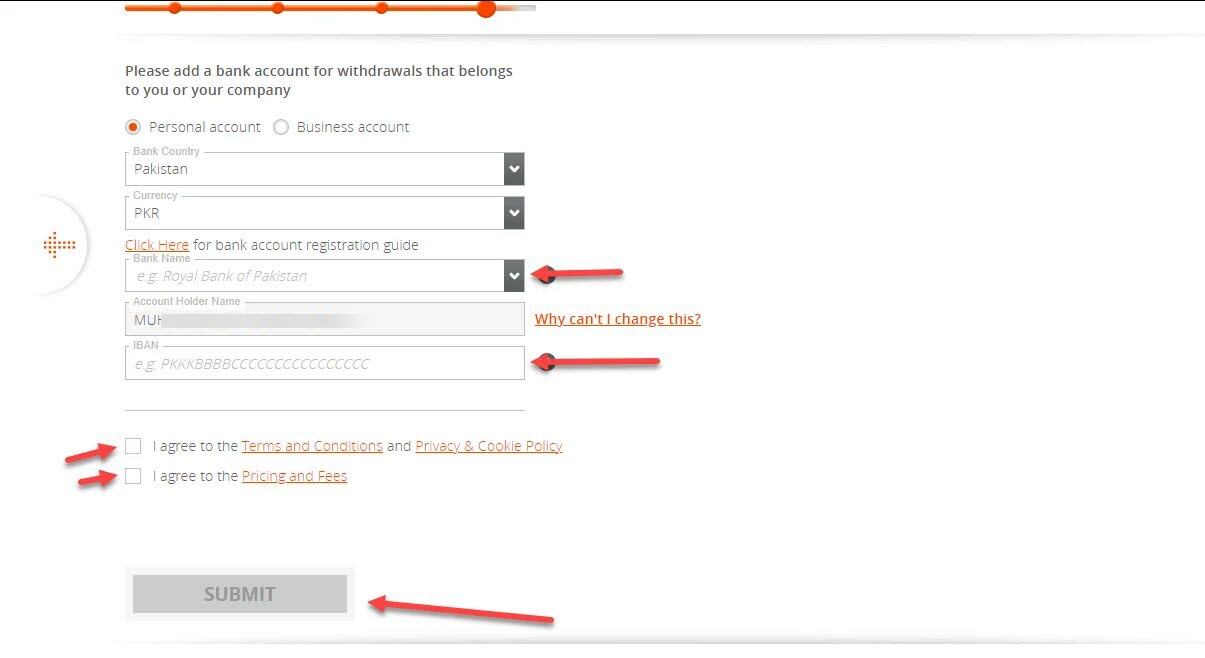
Step 11: Congratulations. Review in Progress.
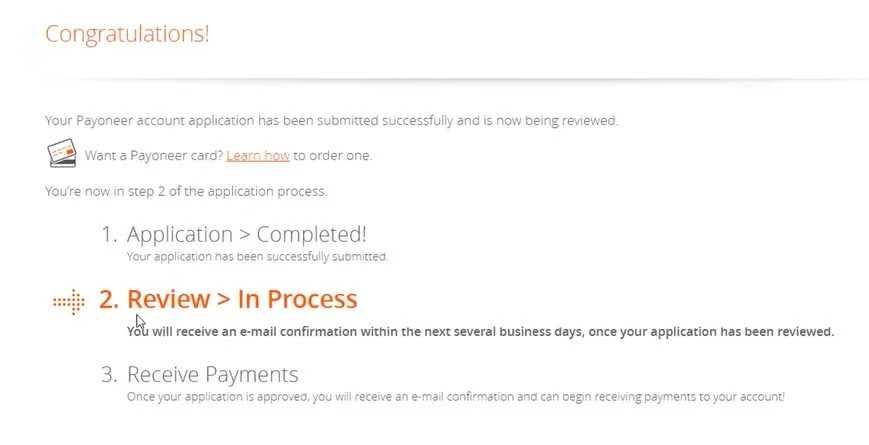
Payoneer account verification
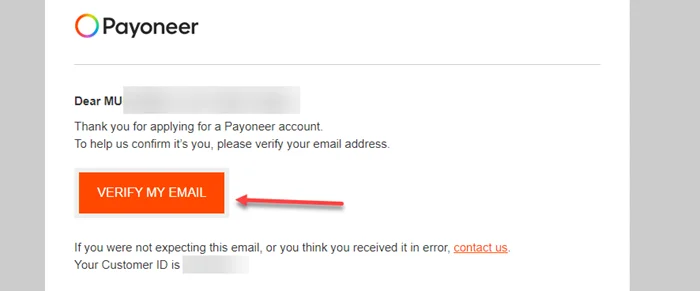
Step 12: Now you can open your Gmail Account and see two new emails. One email is “Verify Email Address” and the Second is “Application Is Under Review“.

Step 13: You just open “Please verify your email address and then click on ” Verify My Email“.
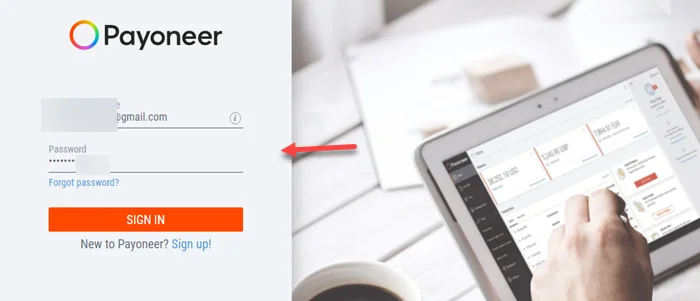
Step 14: Go to the Payoneer website and click on the sign-in button.

Step 15: Now enter your email and password and click on sign in.
Step 16: After login goes to Payoneer> Settings > Verification Center.

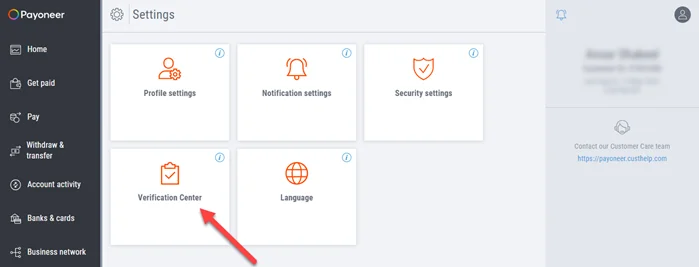
Step 17: Click on Account Verification and then click on Government Issued Photo ID.
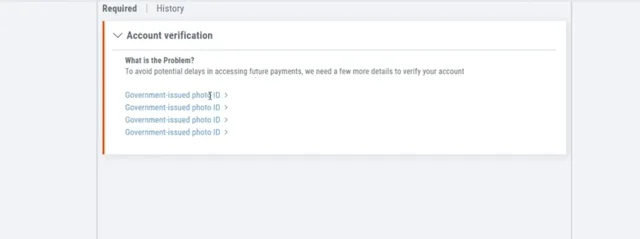
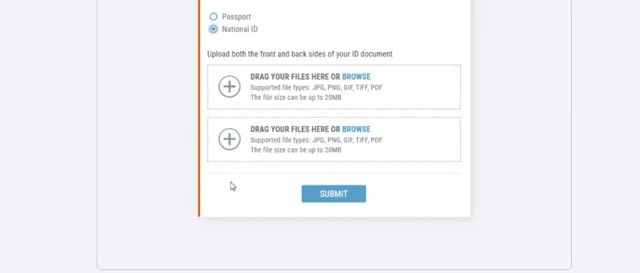
Step 18: Now here you can upload the front and back sides of your ID document. Check Sample here
- Government ID must include full name, address, and clear image.
- Make sure documents are valid and not expired.
- The document must be clearly visible.
- Upload the image in JPG, PNG, GIF, TIFF, and PDF formats.
- Moreover, make sure that the size of the document is less than 3MB.
If you complete all steps including uploading an ID card then it will take one business day. It usually takes 3 to 5 business days to approve.
Noted: After 5 business days, if your account is not approved, contact support and call Payoneer from the links below.
How to add & link a Payoneer account on Fiverr
Fiverr is a freelancer platform where people sell services to international and local clients. It is the best to place for beginners who want to earn money online. Please follow the below guidelines to attach Payoneer to your Fiverr account.
Noted: If you want to earn money and don’t have a Fiverr account then create a Fiverr account from the below link.
Learn How to Create a Fiverr account and Gigs.
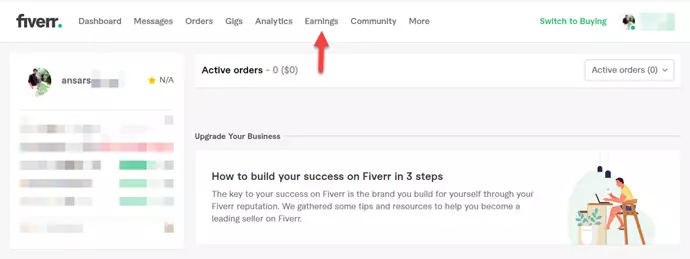
Step 1: Login into Account > Click on Revenues
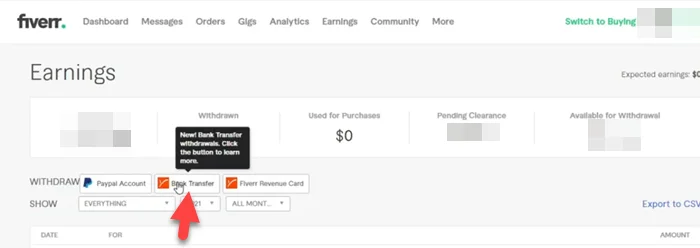
Step 2: Click on Bank Transfer.
Step 3: Now click on “Verify By SMS“.
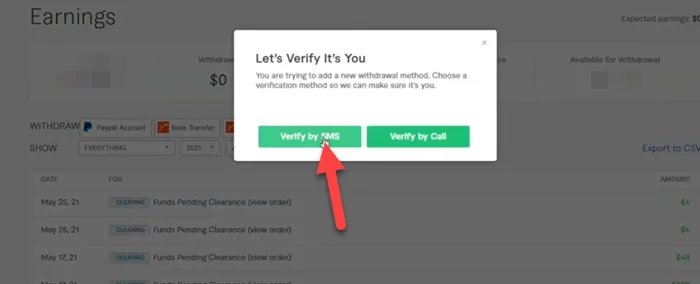
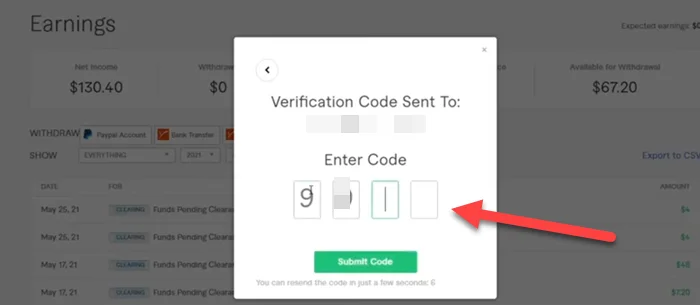
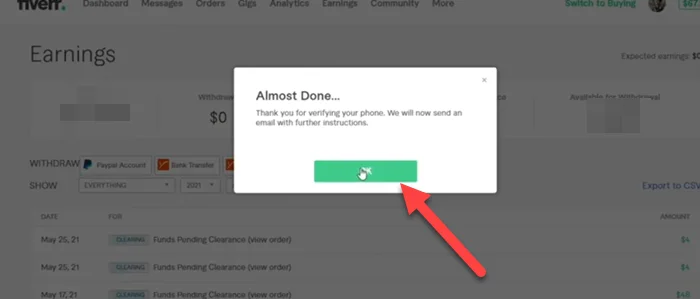
Step 4: Enter the verification code that receives on phone. Last click on Okay.
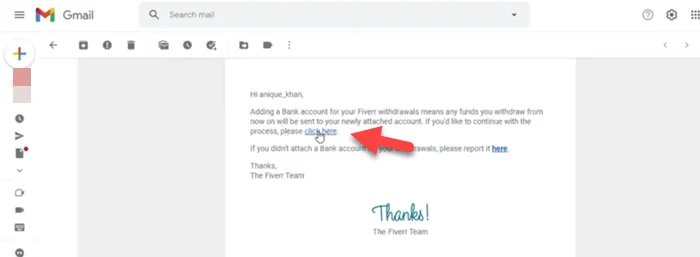
Step 5: Login into a Gmail account and open an email. The last click on ” Click Here”
Step 6: Click on “Get Started“
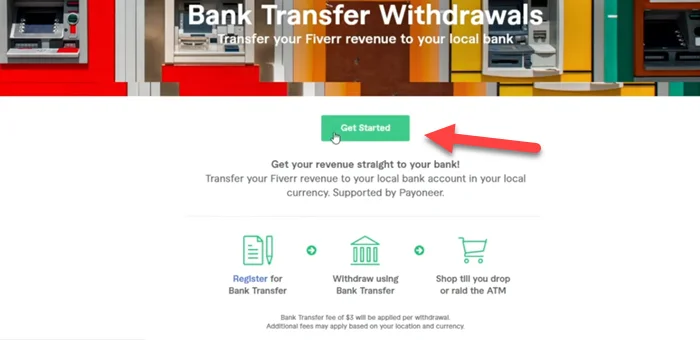
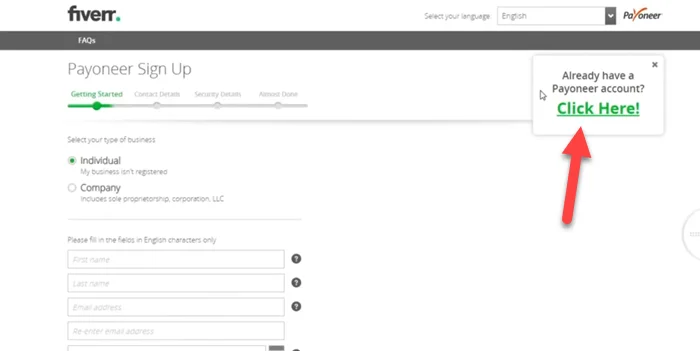
Step 7: If you already have a Payoneer account then “Click Here!“. if not then go here to create Payoneer Account.
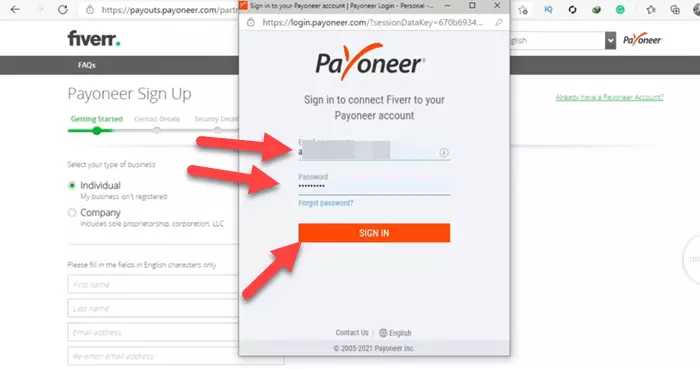
Step 8: Enter username and password. Click on Sign In.
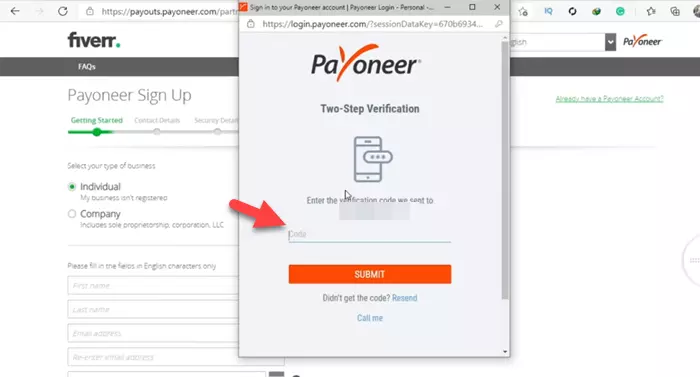
Step 9: Enter the phone verification code and click on submit.
Step 10: Done All. Just wait for the approval email.

Now you can easily withdraw payments from Fiverr easily using Payoneer. From Payoneer, you can send money directly to a local bank.
How to Link Payoneer on Upwork
Upwork is one of the best freelancing marketing places in the world. Here we will show you how to link Payoneer on upwork for withdrawing money. So let’s start to learn how to attach Payoneer on upwork.
Step 1: Go to Profile Image > Click on Settings.

Step 2: Under user settings,> Click on Get Paid.

Step 3: Now scroll down and click on Add Method.

Step 4: Now Click on Setup under the Payoneer section.
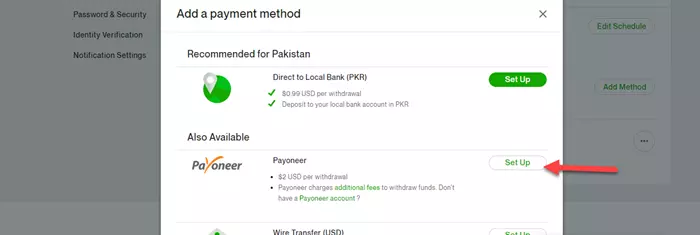
Step 5: Last, Click Here! under already have a Payoneer account?. Enter username and password > click on Sign In. Done All.

Create a Payoneer account without Bank Account
You can create a Payoneer account without a bank account using the freelancing platform but if you are in Pakistan you should use JazzCash to create a Payoneer account without a bank account.
So let’s start with how to make a Payoneer account without a bank account.
Step 1: Create or login into your Fiverr Account.
Step 2: Under the Selling tab, go to the Settings menu and select Earnings.
Step 3: Select Withdrawal options on the next screen.
Step 4: Click the Payoneer Bank Transfer option.
Step 5: Go to the Payoneer registration page.
Step 6: Now you can follow the above step to move forward.
That concludes our discussion. You can open a Payoneer account without having a bank account in this way.
If you don’t have a Fiverr account, you can join Payoneer using any of the websites listed below without having to provide your bank account information.
List of websites that pay through Payoneer
- Fiverr
- Upwork
- 99Designs
- Freelancer
- Amazon Affiliate Program
- PeoplePerHour
- TeeSpring
- Airbnb
- Envato
- Expert360
Why isn’t my Payoneer account approved?
Here we are listing some reasons why isn’t Payoneer account approved.
- Already have an account
- Enter wrong information such as Id card number and bank name.
- Country Restrictions
- Has a previous Payoneer account that was blocked by them
Already have an account
Users can only have one Payoneer account open at a time. There are some rare cases where the user can open two accounts at the same time. However, these are exceptional exceptions.
Enter wrong information
We already say to enter all information 100% correctly when you start creating a Payoneer account. small mistakes become a reason for the unapproved. please make sure to put your real name, address, and bank name.
Has a previous Payoneer account that was blocked by thems
You will not be able to resume service by registering a new account if you had a previous account that was closed due to a violation of our Terms and Conditions.
Country Restrictions
While we provide our services in more than 200 countries, we are currently unable to provide services to some of them if your nation is one of them then the application will be rejected.
A fresh new look for your Payoneer account
Your Payoneer account now has a fresh and intuitive design and feel as a result of your input, making navigating and using your account much faster and more effective. You’ll find that accessing the services you need is not only more attractive to the eye but also a lot more user-friendly, thanks to the navigation menu’s new appearance and feel.
Summary
Overall, Payoneer is the greatest online payment solution for withdrawing money/cash earned online directly into your local bank account. It can also be used on online buying platforms. Use Payoneer instead of Paypal if your country does not support it. Furthermore, any international internet money transactions no longer require the use of risky third-party payment services.
Frequently Asked Questions
Is the Payoneer account free?
Yes, the Payoneer account is free. Transferring from Payoneer to Payoneer is 100% free. It only takes a small percentage when we send and receive payment.
What documents are required for a Payoneer account? Or What is needed to open Payoneer?
ID Card( Take a Picture of ID Card from Front and Back ) View Sample
Other Bank Account Details ( Bank account with same ID Card Name)
IBAN number of Bank Account ( You find in Cheque book ) View Sample
Full Name, Date of birth( Same as the ID Card 💳)
Full Residential Address ( Same available on ID Card)
Email Address and Phone number (Used For Verification Purposes)
How do I approve my Payoneer account?
You can approve a Payoneer account by uploading the front and back of the ID card and also uploading the address verification documents.
Does Payoneer have a mobile app?
Yes, Payoneer has mobile app. iOS and Android devices are currently supported by the Payoneer mobile app.
Can I attach my Payoneer card to my Fiverr account?
Yeah you can attach a Payoneer card to your Fiverr account
1. log in to Fiverr Account > Click on Revenues
2. Withdraw using the Fiverr revenue card
3. Then you will get a confirmation message to your Gmail id then click on the link given in the message
4. If you don’t have a Payoneer account you can create one there, if you have one click on already have account
5. Type your username and password
Finally, your Payoneer card is attached to your Fiverr account.
Can I create Payoneer without a bank account?
You don’t need a bank account to register for Payoneer, but you will need one to withdraw your money to a local bank. Alternative you can withdraw money through Jazz Cache.
You can also register for Payoneer without a local bank account by registering through a company or marketplace like Fiverr, UpWork, or JazzCash (Pakistan)
Can anyone open a Payoneer account?
Yes, but all applicants are required to be over the age of 18.
Countries Where Payoneer Is Accepted.
Afghanistan, Albania, Algeria, Andorra, Angola, Antigua and Barbuda, Argentina, Armenia, Australia, Austria, Azerbaijan, Bahamas, Bahrain, Bangladesh, Barbados, Belarus, Belgium, Belize, Benin, Bhutan, Bolivia, Bosnia and Herzegovina, Botswana, Brazil, Brunei, Bulgaria, Burkina Faso, Burundi, Côte d’Ivoire, Cabo Verde, Cambodia, Cameroon, Canada, Central African Republic, Chad, Chile, China, Colombia, Comoros, Congo (Congo-Brazzaville), Costa Rica, Croatia, Cuba, Cyprus, Czechia (Czech Republic), Democratic Republic of the Congo, Denmark, Djibouti, Dominica, Dominican Republic, Ecuador, Egypt, El Salvador, Equatorial Guinea, Eritrea, Estonia, “Eswatini (fmr. “”Swaziland””)”, Ethiopia, Fiji, Finland, France, Gabon, Gambia, Georgia, Germany, Ghana, Greece, Grenada, Guatemala, Guinea, Guinea-Bissau, Guyana, Haiti, Holy See, Honduras, Hungary, Iceland, India, Indonesia, Iran, Iraq, Ireland, Israel, Italy, Jamaica, Japan, Jordan, Kazakhstan, Kenya, Kiribati, Kuwait, Kyrgyzstan, Laos, Latvia, Lebanon, Lesotho, Liberia, Libya, Liechtenstein, Lithuania, Luxembourg, Madagascar, Malawi, Malaysia, Maldives, Mali, Malta, Marshall Islands, Mauritania, Mauritius, Mexico, Micronesia, Moldova, Monaco, Mongolia, Montenegro, Morocco, Mozambique, Myanmar (formerly Burma), Namibia, Nauru, Nepal, Netherlands, New Zealand, Nicaragua, Niger, Nigeria, North Korea, North Macedonia, Norway, Oman, Pakistan, Palau, Palestine State, Panama, Papua New Guinea, Paraguay, Peru, Philippines, Poland, Portugal, Qatar, Romania, Russia, Rwanda, Saint Kitts and Nevis, Saint Lucia, Saint Vincent and the Grenadines, Samoa, San Marino, Sao Tome and Principe, Saudi Arabia, Senegal, Serbia, Seychelles, Sierra Leone, Singapore, Slovakia, Slovenia, Solomon Islands, Somalia, South Africa, South Korea, South Sudan, Spain, Sri Lanka, Sudan, Suriname, Sweden, Switzerland, Syria, Tajikistan, Tanzania, Thailand, Timor-Leste, Togo, Tonga, Trinidad and Tobago, Tunisia, Turkey, Turkmenistan, Tuvalu, Uganda, Ukraine, United Arab Emirates (UAE), United Kingdom, United States of America (USA), Uruguay, Uzbekistan, Vanuatu, Venezuela, Vietnam, Yemen, Zambia, Zimbabwe


